PhotoAppLink is an open source library allowing your iOS photo app to launch other participating photo apps while passing along the current image.
This will allow users to easily process an image using a combination of multiple photo apps without having to save intermediate images to the camera roll, quitting one app, launching the next, loading up the intermediate image....
Instead the user simply selects a "Send to app" option which presents all compatible apps in a nice interface. The selected app is then launched and the current image is passed along so that the user can keep editing it in that app immediately. This provides a more fluid user interface to the user and encourages the use of compatible apps.
The library manages the discovery of compatible apps installed on the user's device. Furthermore it also provides a nice user interface for discovering and purchasing additional compatible apps. This will provide promotion of your app through other compatible apps and will also give you another revenue source through the use of Linkshare links. That is if a user buys a compatible app discovered through PhotoAppLink in your app then you will get the commission for the sale.
To enable this image exchange between photo apps, the library makes use of a custom clipboard in combination with custom URL schemes.
The current image is first stored on the custom clipboard before the destination app is invoked via a special URL scheme it has registered for, such as for example colorsplash_photoapplink://. The destination app then pulls the image off the custom clipboard and proceeds straight into its main editing mode with the passed in image.
To find out which apps are supported and what URL schemes they use, the library contacts a server (photoapplink.com) and downloads a plist file with this information. The data is cached on disk so that PhotoAppLink will work offline after the initial download.
The repository contains a sample app inside the TestApp/ subdirectory. You can take a look at this app's code for an example of how to integrate and use the PhotoAppLink library (in addition to the documentation provided below). The relevant parts of the code are fairly well documented.
Furthermore you can use this test app as an example sender and receiver of images for testing the PhotoAppLink integration in your own app during development.
The steps required to integrate PhotoAppLink depend on whether your app will support only sending images to other apps, only receiving images, or both. If it makes sense at all for your app we strongly encourage you to support both sending and receiving. However we realize that for some types of apps it is appropriate to act purely as a sender or receiver of images.
The first step in any case is to
- drag the complete
PhotoAppLink/subdirectory into your XCode project. Make sure the option Copy items into destination group's folder is checked in the dialog that appear after you drag the folder into XCode's project navigator.
To be able to send the current image to other participating apps, the library first needs to download information about the currently supported apps from the server.
- In your
UIApplicationDelegatesubclass add:#import ”PALManager.h” - At the beginning of your app delegate's
applicationDidBecomeActive:method add:
[[PALManager sharedPALManager] updateSupportedAppsInBackground];
This will start a background thread to download the latest version of the plist mentioned above. It will perform such an update at most every 4 hours and will only download the plist file if it has actually changed since the last successful download to avoid unnecessary bandwidth use. Icons for participating apps will also be downloaded and cached if needed.
Next you will have to add the "Send to app" feature into your app's UI. We recommend using the following test and only offer the "Sent to app" option in your UI if it is true:
BOOL appsAvailable = [[[PALManager sharedPALManager] supportedApps] count] > 0;This ensures that there are compatible apps supported on the user's device that either can be launched or at least discovered and purchased via the "More apps" view.
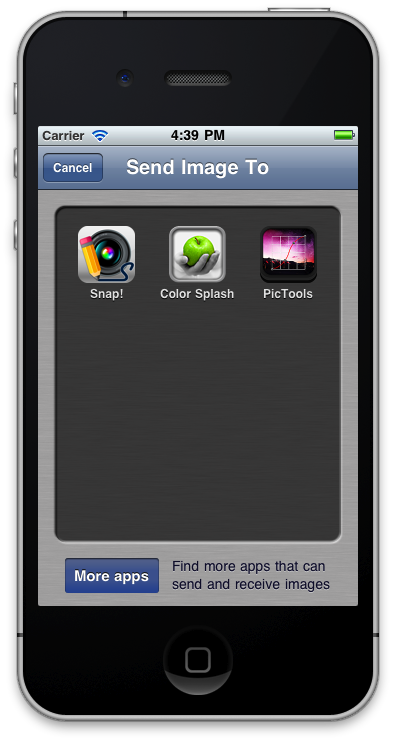
The library includes the PALSendToController view controller which presents the available apps to the user in a nice UI (see first image above).
The PALSendToController class not only displays the supported apps installed on the user's device but also takes care of actually invoking the selected app and passing along the current image.
You have two options for how to specify the current image:
- You can set the
imageproperty on yourPALSendToControllerinstance before presenting it. - Alternatively you can delay creating the image until the user actually selects one of the compatible apps to invoke. In this case you would register a delegate with
PALSendToControllerand implement the following delegate method
- (UIImage*)imageForSendToController:(PALSendToController*)controller {
	// create an UIImage of your app's current edited image in full resolution and return it here
	return [self currentFullResolutionImage];
}The PALSendToController is designed to be added to a UINavigationController. You can either push it onto an existing navigation controller or use it as the root view controller of a new navigation controller and then present that modally like so:
- (void)presentModalSendToUI {
	PALSendToController *sendToVC = [[[PALSendToController alloc] init] autorelease];
	sendToVC.image = [self currentFullResolutionImage];
	UINavigationController* nav = [[[UINavigationController alloc] initWithRootViewController:sendToVC] autorelease];
	[self presentModalViewController:nav animated:YES];
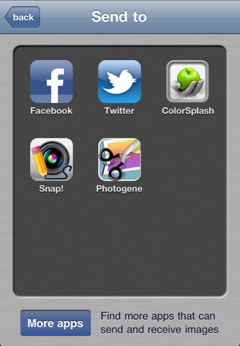
}In addition to presenting the compatible apps installed on the user's device the PALSendToController allows you to add your own app specific sharing options.
For example you might have implemented sharing the current photo to Facebook and Twitter in your app. If you like you could add these options to the UI presented by PALSendToController like this:
- (void)presentSendToUI
{
	PALSendToController *sendToVC = [[[PALSendToController alloc] init] autorelease];
	sendToVC.image = [self currentFullResolutionImage];
	sendToVC.delegate = self;

	// Add custom buttons for your own sharing options
	[sendToVC addSharingActionWithTitle:@"Facebook" icon:[UIImage imageNamed:@"Facebook.png"] identifier:1];
	[sendToVC addSharingActionWithTitle:@"Twitter" icon:[UIImage imageNamed:@"Twitter.png"] identifier:2];

	[self.navigationController pushViewController:sendToVC animated:YES];
}

#pragma mark - PALSendToControllerDelegate
// Delegate method that gets called when a custom sharing item is selected by the user.
- (void)photoAppLinkImage:(UIImage*)image sendToItemWithIdentifier:(int)identifier
{
	switch (identifier) {
	case 1:
		[self sendImageToFacebook:image];
		break;
	case 2:
		[self sendImageToTwitter:image];
		break;
	}
}PALSendToController provides several additional optional delegate methods (specified in PALSendToController.h) through which you can customize things such as how you want to dismiss the view controller after the user selects an app to invoke. However the default behaviours should work just fine in most cases.
While we recommend using the PALSendToController you can also implement your own custom UI for presenting the available apps to the user:
- First check the array returned by
[[PALManager sharedPALManager] destinationApps]. If it’s not empty, then there are compatible apps installed that can receive images. - Use the array to iterate through all the
PALAppInfoobjects and build your own UI. ThePALAppInfoobjects contain the apps' name, icon, description and more. - Once the user selects one of the apps, call
[[PALManager sharedPALManager] invokeApplication:appInfo withImage:currentImage]to launch the selected app.
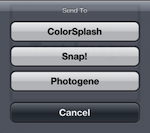
Yet another option is to use a simple UIActionSheet:
UIActionSheet *actionSheet = [[PALManager sharedPALManager] actionSheetToSendImage:[self currentFullResolutionImage]];
// Present in your view or using another show* method.
[actionSheet showInView:self.view];
You don’t have to worry about implementing the action sheet delegate or dismissing it, as PALManager handles all this for you and also takes care of sending the image to the selected app.
Before presenting such an action sheet you must always check though that there are actually destination apps installed that could be displayed:
BOOL destinationAppsAvailable = [[[PALManager sharedPALManager] destinationApps] count] > 0;If you are using the action sheet or a custom UI that does not use icons to represent the apps, then you should set the USING_APP_ICONS definition in PALConfig.h to NO to avoid unnecessary downloading of the icons for all supported apps.
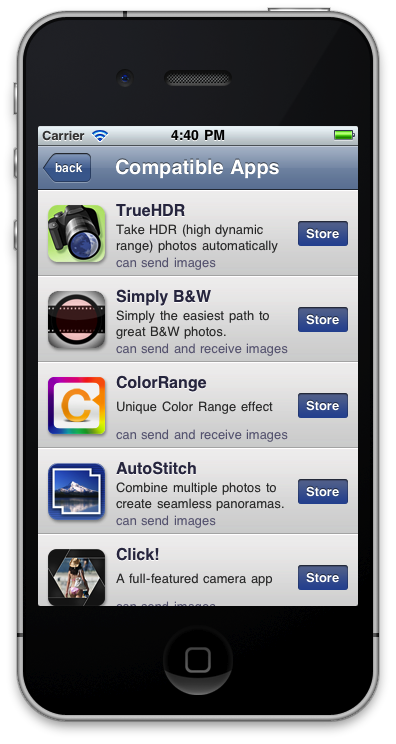
One nice feature in PhotoAppLink is the cross promotion of other compatible apps. Your app can be discovered inside other PhotoAppLink compatible iOS apps, so you’ll sell more copies. And when a user discovers another PhotoAppLink compatible app in your app and buys it you’ll get a commission for the sale too!
At the bottom of the PALSendToController UI, you will notice a “More Apps” button. When tapped, a PALMoreAppsController is presented that shows a list of all the participating apps the user DOESN’T have installed that are compatible with his/her device. The "Store" button next to each app takes the user to the App Store, passing along the LinkShare ID for the iTunes Affiliate program.
To ensure that you will receive the Linkshare commission you will need to
- Sign up for the iTunes Affiliate program.
- Find your 11 character Linkshare siteID as described on this page
- Edit
PALConfig.hto set the value ofLINKSHARE_SITE_IDto your own Linkshare siteID.
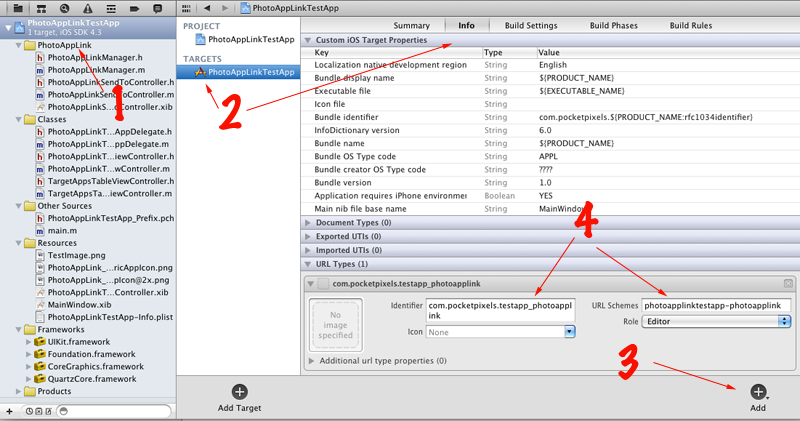
First, you need to register a custom URL scheme for your app, which will allow other participating apps to launch it. In XCode4 this is easy to do:
- On the Project navigator click on your project
- Go to the Info tab of your target app
- On the bottom right corner, click Add->Add URL Type
- At the bottom of your app’s properties you’ll see the new “Untitled” URL type. Expand that and enter a unique Identifier (for example your app's bundle identifier with ".photoapplink" appended).
The URL scheme can be anything, but we recommend you useyourappname-photoapplink(where obviously you would replace theyourappnamepart). You can ignore the Icon and Role fields.
Next you need to implement the handling of your app being launched via the custom URL scheme you just specified. In general this should involve the following steps:
- If the app wasn't running before, perform general app initialization
- Verify that the app was indeed launched via the custom URL scheme you picked for PhotoAppLink
- Get the passed in
UIImage*by calling[[PALManager sharedPALManager] popPassedInImage] - Display the image in your app and proceed to your app's main editor UI.
Because the way that custom URL launches are handled has changed multiple times throughout the history of iOS, getting things to work right on all versions of iOS can be a little tricky. We recommend using the following structure, which should do the right thing for iOS 3.0 and later:
// Handle the URL that this app was invoked with via its custom URL scheme.
// This method is called by the different UIApplicationDelegate methods below.
- (BOOL)handleURL:(NSURL *)url
{
	// Retrieve the image that was passed along from the previous app.
	UIImage *image = [[PALManager sharedPALManager] popPassedInImage];
	if (image != nil) {
		// TODO: Handle the passed in image as appropriate
		// Maybe something like self.mainView.image = image;
		// It really depends on your app...
		return YES;
	}
	return NO;
}

- (BOOL)application:(UIApplication *)application didFinishLaunchingWithOptions:(NSDictionary *)launchOptions
{
    // basic app setup
    [window addSubview:navigationController.view];
    [window makeKeyAndVisible];

    NSURL* launchURL = [launchOptions objectForKey:UIApplicationLaunchOptionsURLKey];
    if (launchURL != nil) {
        // In iOS4 and later application:handleOpenURL: or application:openURL:sourceApplication:annotation
        // are invoked after this method returns.
        // However in iOS3 this does not happen, so we have to call our URL handler manually here.
        if ([[[UIDevice currentDevice] systemVersion] floatValue] < 4.0f) {
            return [self handleURL:launchURL];
        }
    }
    else {
        // normal launch from Springboard
        // TODO: proceed with your normal app startup
    }

    return YES;
}

// This method will be called on iOS 4.2 or later when the app is invoked via its custom URL scheme
// If the app was not running already, application:didFinishLaunchingWithOptions: will have been called before
- (BOOL)application:(UIApplication *)application openURL:(NSURL *)url
  sourceApplication:(NSString *)sourceApplication annotation:(id)annotation
{
    return [self handleURL:url];
}

// This method will be called for iOS versions 4.0 and 4.1 when the app is invoked via its custom URL scheme
// If the app was not running already, application:didFinishLaunchingWithOptions: will have been called before
- (BOOL)application:(UIApplication *)application handleOpenURL:(NSURL *)url
{
    return [self handleURL:url];
}Once you have integrated PhotoAppLink into your app by following the steps above it is time to test whether it actually works.
As already mentioned above you can use the example app in the TestApp/ subdirectory as a counterpart to test sending images to it and receiving a test image from it. Simply open the XCode project TestApp/PhotoAppLinkTestApp.xcodeproj and compile and run it to install the app on your iOS Simulator or device.
To be able to test sending images to your app, you will have to add your app's info to the plist containing the list of compatible apps. During testing you can use your own plist file, edit it and then point PhotoAppLink to that. We recommend using the awesome Dropbox for hosting the file:
- Open the included file
photoapplink_debug.plistin XCode. This is a sample plist that describes a few PhotoAppList compatible apps, including the test app. - This plist contains an array of dictionaries representing the supported apps. Duplicate one of these dictionaries and customize it for your app (see below for a description of the fields).
- Save this file, copy it to your Dropbox public folder and get it’s URL (via the Dropbox context menu in the Finder).
- Open PALConfig.h in the project for the sending app and change the URL of the
#define DEBUG_PLIST_URLby pasting in the Dropbox URL for your edited plist file.
The debug plist is used only if DEBUG is defined in the preprocessor. To set this definition, add the following setting to your XCode build setting:
Make sure that this DEBUG definition is active only for debug builds and not for the final release build.
Most of the entries in the plist dictionary for an app are fairly self-explanatory:
- name: Your app's name as you want it to appear in the PhotoAppLink UI.
- description: Short description used in the “More Apps” list. Make it short enough not to truncate the text and interesting enough to get people to check out your app.
- appleID: Your app’s iTunes ID. One way to get it is by connecting to iTunes Connect, clicking “Manage your applications” , clicking on your app, then on "View Details" and finally "Binary Details". Your Apple ID should be listed there.
- bundleID: Your bundle ID is what you configured in your Info.plist “Bundle identifier”. It is also listed in the "Binary Details" in iTunes Connect.
- canReceive: Whether your app supports receiving images using PhotoAppLink.
- canSend: Whether your app supports sending images using PhotoAppLink.
- liveOnAppStore: Whether a version of your app with PhotoAppLink support is live on the App Store already. This only affects whether your app will be listed in the “More apps” UI (because we don't want to list apps there that don't yet have PhotoAppLink support).
- freeApp: Whether your app is a free app. If yes, then the button on the “More Apps” list will say “FREE” instead of "Store".
- platform: Can be “iPhone”, “iPad” or “universal”. This is used to filter the “More Apps” list to only show apps supported on the user's device.
- scheme: The URL scheme you registered for launching your app (as discussed above, something like “yourapp-photoapplink”). If your app doesn't support receiving images you can ignore this field.
- thumbnailURL: The URL for your app’s 57×57 icon image.
- thumbnail2xURL: The URL for your app’s 114×114 icon image.
Once you have successfully integrated PhotoAppLink into your app and are ready to submit it to the App Store you should send us the plist entry for your app so that we can add it to the plist on our server. Just make a copy of the photoapplink_debug.plist you modified above, delete all the other lines of the array leaving only your dictionary and send us this file to [email protected]. Then it’s just a matter of us copy/pasting this info into the production plist that gets downloaded by every PhotoAppLink compatible app.
Please also email us the 512 pixel icon of your app along with the info whether it has the default App Store shine applied or not so that we can create the appropriate 57 and 114 pixel icons for your app.
Finally please send us another email as soon as the PhotoAppLink compatible version of your app goes live on the App Store. We can then change the status of your app’s liveOnAppStore field to true so that your app can be discovered in other participating apps.
If you have a question not answered here feel free to contact us at [email protected].
And if you discover a bug in the PhotoAppLink code, please open an issue for it here on github.
