Human Body
In this tutorial we will show you how to model the human body. This is an ongoing project so make sure to check back for updates.

We're striving for realism, here - this is not meant to be a mannequin or cartoon character, at least not in its finished form. We will attempt to maintain correct body proportions using a method that's common to classical figure drawing. Bone, muscle, and cartilage will all be present. If you have any experience in figure drawing, your input is welcome. Feel free to edit this document or submit a pull request with your changes to the body.scad script.
Also please note this is a project that is meant to push the limits of OpenSCAD. As of 3/10/2015, rendering a model of the full body takes 2-3 minutes on my machine. This is done on an overclocked liquid cooled CPU. If you wish to follow along, it is highly recommended you do so by rendering one small region of the body at a time. As you will see, relativity.scad makes this rather easy with some help from the attach() module. You can still render the full body, but it is recommended your computer have at minimum 16 GB of memory. It is also recommended you use a stable release of OpenSCAD - I've tried this on development builds but have gotten mixed results.
With that out of the way, let's begin. First we'll introduce you to some important background information. We'll go over our general approach, explaining how we decide to size and position our geometric primitives. We'll model the skeleton over several iterations of increasing complexity. This skeleton will provide us with a framework for modeling the rest of the body. We'll add attachment points to the skeleton, and the hull of these points will render the muscle. Then using the muscle, we can perform another set of hull operations in order to render the skin.
Artists have tried for millennia to model the human body, with varying degrees of success. The Egyptians, for instance, had a pretty well established method that involved drawing a number of dots on a 2d grid. You'd connect the dots and get a human:
[[http://upload.wikimedia.org/wikipedia/commons/c/cc/Canon_of_proportion.(1902)-_TIMEA.jpg|width=300px|align=center]]
Artists have a name for such a well established method of drawing. It's called a canon of proportion. You might already be familiar with one such canon used by the Romans. It was described by a person named Vitruvius, then popularized by Leonardo Da Vinci in his famous drawing, The Vitruvian Man:
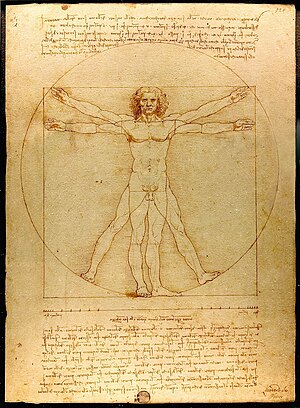
Here's what Vitruvius had to say about the method:
For the human body is so designed by nature that the face, from the chin to the top of the forehead and the lowest roots of the hair, is a tenth part of the whole height; the open hand from the wrist to the tip of the middle finger is just the same; the head from the chin to the crown is an eighth, and with the neck and shoulder from the top of the breast to the lowest roots of the hair is a sixth; from the middle of the breast to the summit of the crown is a fourth... The length of the foot is one sixth of the height of the body; of the forearm, one fourth; and the breadth of the breast is also one fourth. The other members, too, have their own symmetrical proportions, and it was by employing them that the famous painters and sculptors of antiquity attained to great and endless renown.
As you can see, a lot of it has to do with how the size of major body parts compare with overall height. Others would later simplify this by comparing the size of one body part relative to another. Most often, this other body part would be the head. The head turns out to be a convenient unit of measure that is approximate to many other measurements in the body. As an example, the height of the head is roughly equivalent to length of the hand. Expressing sizes relative to the head is a practice that continues to this day, in some forms of figure drawing.
There's just a few problems with this approach, though. Vitruvius largely discusses the size of the body in only two dimensions. He might say a certain part is so tall or so wide, but he only rarely mentions depth. Other more recent canons (the one by Ruebens, for instance) do much the same. It's true a good artist should be able to draw a figure at any angle and for that there are certain rules, but the artist has the privilege of falling back on intuition when nothing is offered by the canon. As modelers, though, we don't have this privilege. OpenSCAD needs to know the exact depth of these objects, and we want to base our numbers on sound judgement.
Tied in with this problem is the fact that parts of the body such as the head cannot be modeled by our geometric primitives. Neither are they approximated by slightly irregular shapes like ellipses - we can't just call resize() on a sphere() and expect to get a head. We need to break the head down into component parts, and each component must be modeled by one of the basic geometric primitives.
You might think using OpenSCAD is crippling us in a way, forcing us to work with geometric primitives, but artists have already worked with geometric primitives for some time. It turns out to be much easier drawing simple objects like spheres, as opposed to nebulous things like heads.

The method we use for this exercise was developed in order to combat the problems we outlined. It was first developed by an man named Robert Beverley Hale. Like with past methods, he established a way to compare sizes among certain parts of the body. Unlike his predecessors, though, he based his measurements off the skeleton, with the cranium acting as the primary unit of measure. There is a unique advantage towards using the cranium as a unit of measure - it has roughly the same diameter no matter what the vantage point. In other words, we can model it as a simple sphere. All other measurements in the body can be derived from this unit by simply observing the body from the right vantage point. As an added benefit, bones like the cranium are much less subject to variation, which means we do not need to rely on arbitrary measurement when OpenSCAD calls for precise values.
We are not strictly limited to the cranium, of course. We only use the cranium because it's so spherical. Other body parts are spherical, too. The eye, for instance, is a near perfect sphere that is approximately one fifth the diameter of the cranium, and we will use it when describing facial features. From time to time, we'll use other units of measure, where appropriate.
So let's bone up on the skeleton. Here's the link to a video:

We'll try to use the same methods from this video, but from time to time we'll need to fall back on our own observations, particularly when there's no other information available. We'll use our own reference image so we can mark it up as we please. For consistency, this reference will be used for all measurements.

First, we'll need to establish a size for our cranial unit. The height of the average male is around 5'6" or 1670mm. We observe from our reference that the total body height is around 12.5 cranial units.
height = 1670;
unit = height/11.5;
The cranium, as mentioned, is a simple sphere.
ball(unit, $class="cranium bone");

Note the conventions we will use for class names: "bone" is appended to anything that's a bone. This will help us later when selectively rendering different parts of the body.
We won't fuss with details yet, so we'll skip the face. The neck starts at the base of the cranium and is also 1 cranial unit in length. Its diameter is smaller, we'll say a third of the cranial unit. Below that are the ribs, which for now will be 2 spheres of 1 unit each. The lower back ("lumbar") is another unit past this, followed by the hip bones ("ilium"), which in males are two unit spheres placed side-by-side. The human body is roughly symmetric, so we will invoke mirrored(y) to save us from doing everything twice. Since everything is mirrored along the y axis, we ought to pick a side to work with, for consistency. Everything we do will be done in the +y region.
mirrored(y)
ball(unit, $class="cranium bone"){
    align(-z)
    rod(d=1/3*unit, h=unit, $class="cervical bone"){
        align(-z, $class="ribs bone")
        ball(unit){
            align(-z)
            ball(unit)
            align(-z)
            rod(d=1/3*unit, h=unit, anchor=z, $class="lumbar bone"){
                align(-z)
                ball(unit, anchor=z, $class="ilium bone");

                align(-y-z)
                ball(unit, anchor=-y+z, $class="ilium bone");
            };
        }
    }
}

2.5 units below the Ilium is the lower condyle (big lump) of the femur (thigh bone). Another 2.5 units below that is a condyle for the tibia (shin bone).
mirrored(y)
ball(unit, $class="cranium bone"){
align(-z)
rod(d=1/3*unit, h=unit, $class="cervical bone"){
        align(-z, $class="ribs bone")
        ball(unit){
            align(-z)
            ball(unit)
            align(-z)
            rod(d=1/3*unit, h=unit, anchor=z, $class="lumbar bone"){
                align(-y-z)
                ball(unit, anchor=-y+z, $class="ilium bone");
                align(-z)
                ball(unit, anchor=z, $class="ilium bone"){

                    align(-z)
                    translate(2.5*unit*down)
                    translate(25*y)
                    ball(1/2*unit, anchor=-y+z, $class="condyle bone"){
                        align(x-z)
                        ball(1/2*unit, anchor=x+z, $class="tibia condyle bone")
                        align(z)
                        translate(2.5*unit*down)
                        ball(1/4*unit, anchor=-z, $class="tibia bone");
                    }
                }
            }
        }
    }
}

The arms begin at 1.5 units over from the bottom of the neck. The distance from the shoulder to the elbow ("humerus") is 2 units, and the distance from the elbow to the hand ("ulna") is 1.75.
mirrored(y)
ball(unit, $class="cranium bone"){
    align(-z)
    rod(d=1/3*unit, h=unit, $class="cervical bone"){

        align(-x-1.5*z)
        translate(1.5*unit*y){
            ball(d=1/4*unit, anchor=center, $class="humerus bone");

            translate(2*unit*y)
            ball(d=1/4*unit, anchor=center, $class="humerus bone"){
                align(y){
                    ball(d=1/4*unit, anchor=-y, $class="ulna bone");
                    translate(1.75*unit*y)
                    ball(d=1/8*unit, anchor=y, $class="ulna bone");
                }
            }
        }

        align(-z, $class="ribs bone")
        ball(unit){
            //lower center
            align(-z)
            ball(unit)
            align(-z)
            rod(d=1/3*unit, h=unit, anchor=z, $class="lumbar bone"){
                align(-y-z)
                ball(unit, anchor=-y+z, $class="ilium bone");
                align(-z)
                ball(unit, anchor=z, $class="ilium bone"){

                    align(-z)
                    translate(2.5*unit*down)
                    translate(25*y)
                    ball(1/2*unit, anchor=-y+z, $class="condyle bone"){
                        align(x-z)
                        ball(1/2*unit, anchor=x+z, $class="tibia condyle bone")
                        align(z)
                        translate(2.5*unit*down)
                        ball(1/4*unit, anchor=-z, $class="tibia bone");
                    }
                }
            }
        }
    }
}

Here we have the simplest model possible and we've already taken 50 lines of code. The human body is a great deal more complex than a stepper motor. We've got to organize this code.
Fortunately, the attach() module makes this easy. We can write modules for each segment of the body, detail each segment in isolation, then stitch them all back together in one final render.
height = 1670;
unit = height/11.5;

body();

module body(){
    head()
    attach("neck")
    chest(){
        attach("shoulder")
        arm()
        attach("wrist")
        hand();

        attach("waist")
        pelvis()
        attach("crotch")
        leg()
        attach("ankle")
        foot();
    }
}

module head(){
    ball(unit, $class="cranium bone")
    align(-z, $class="neck")
    children();
}

module chest(){
    rod(d=1/3*unit, h=unit, $class="cervical bone"){
        align(-x-1.5*z, $class="shoulder")
        translate(1.5*unit*y)
        children();

        align(-z, $class="ribs bone")
        ball(unit)
        align(-z)
        ball(unit)
        align(-z, $class="waist")
        children();
    }
}

module pelvis(){
    rod(d=1/3*unit, h=unit, anchor=-x+z, $class="lumbar bone"){
        align(-y-z)
        ball(unit, anchor=-y+z, $class="ilium bone");

        align(-z)
        ball(unit, anchor=z, $class="ilium bone")
        align(-z, $class="crotch")
        children();
    }
}

module leg(){
    translate(2.5*unit*down)
    translate(25*y)
    ball(1/2*unit, anchor=-y+z, $class="condyle bone")
    align(x-z)
    ball(1/2*unit, anchor=x+z, $class="tibia condyle bone")
    align(z)
    translate(2.5*unit*down)
    ball(1/4*unit, anchor=-z, $class="tibia bone");
}

module arm(){
    ball(d=1/4*unit, anchor=center, $class="humerus bone");

    translate(2*unit*y)
    ball(d=1/4*unit, anchor=center, $class="humerus bone"){
        align(y){
            ball(d=1/4*unit, anchor=-y, $class="ulna bone");
            translate(1.75*unit*y)
            ball(d=1/8*unit, anchor=y, $class="ulna bone");
        }
    }
}
The above code renders identically to our previous illustrations.
Making this change doesn't just reduce mental overhead. As time goes on, a full body render will take many minutes to complete. Having to wait several minutes to view a small change is unacceptable. This is a large project after all, and we have a lot of small changes to make. Having the ability to render the body in small segments saves us valuable turnaround time.
Before we go any further, there's one more change we need to make. We'll add a set of new modules to represent the way we want to view the body. These modules will be known as "views", and they're part of a larger concept that software developers call the Model-View pattern. Geometric primitives that represent the body (called "models") will be kept separate from CSG operations that indicate how we wish to view the body (called "views"). The first view we add will take a body segment model as a child and render it as a skeleton.
module skeleton(){
    color("white")
    mirrored(y)
    children();
}
We invoke it like so:
skeleton() body();
Its not much now, but we'll add to it as time goes on.
We'll also add another view to illustrate the whole "model-view" concept. This view also takes a body segment model as a child, but unlike the skeleton() view, it renders only muscle.
module muscles(){
    color("red")
    show("muscle")
    children();
}
Seperating model and view allows us to swap out view without changing model, and vice versa. We can, for instance, view the skeleton of the upper body (skeleton() upper_body();), then with a slight tweak view only the muscles (muscles() upper_body()). Then, with another slight tweak we can switch to viewing muscles of the lower body (muscles() lower_body()). We don't have to pour over hundreds of lines expressing body proportion if all we want to do is change view.
Oh, and by the way, our skeleton is white, now.

Our body so far is rather crude. Right now it's just a bunch of balls floating in space. We want to connect those balls to make limbs. The quickest way to do this is to take the hull between certain ball pairs.
module skeleton(){
    color("white")
    mirrored(y)
    hulled("ulna", $class="ulna")
    hulled("humerus", $class="humerus")
    hulled("femur", $class="femur")
    hulled("tibia", $class="tibia")
    children();
}

A few problems exist. The bones aren't as "bumpy" as we'd hope, and the femur is still missing. This is because we haven't yet gotten into details. The condyles can often be pretty complex, and they only represent the outermost segment of the bone. The upper condyle of the femur was so complex we left it out entirely. We need to break these components down some.
Before we go any further, we should note: beyond this point, full body renders become slow. From now on we'll only work with the body in segments. We'll only use the skeleton() view when needed. Not only does this speed up renders, but we'll also better see the balls we place. We start with the lower body:
pelvis()
attach("crotch")
leg();

First, the femur. Let's take a look at our reference photo, again. We see the top condyle of the femur is oblong. We can approximate it by two balls of different size. The first ball is 1/4 cranial units in diameter and it's center is aligned with the y axis of the rear pubis (that is, the bottom part of the pelvis). The second ball is half a cranial unit and its top part aligns with the y axis of the first ball.
module leg(){
    color("blue")
    ball(d=1/2*unit, anchor=-x-y+z, $class="pubis"){
        align(-x+y)
        ball(d=1/4*unit, anchor=-y, $class="femur condyle bone")
        ball(d=1/2*unit, anchor=-y+z, $class="femur condyle bone");
    }

    translate(2.5*unit*down)
    translate(25*y)
    ball(1/2*unit, anchor=-y+z, $class="femur condyle bone")
    align(x-z)
    ball(1/2*unit, anchor=x+z, $class="tibia condyle bone")
    align(z)
    translate(2.5*unit*down)
    ball(1/4*unit, anchor=-z, $class="tibia bone");
}

Now, the lower condyle of the femur also requires some detail. We can break the condyle down into 3 balls, one of which designates the attatchment to the rest of the bone.
module leg(){
    ball(d=1/2*unit, anchor=-x-y+z, $class="pubis"){
        align(-x+y)
        ball(d=1/4*unit, anchor=-y, $class="condyle")
        ball(d=1/2*unit, anchor=-y+z, $class="condyle"){
            ball(d=1/4*unit,            $class="femur");
        }
    }

    translate(2.5*unit*down)
    translate(1*inch*y)
    ball(d=1/4*unit, anchor=-y+z, $class="condyle bone"){

        align(y)
        ball(d=1/4*unit, anchor=-y, $class="condyle bone");

        align(x+y)
        ball(d=1/4*unit, anchor=x, $class="femur bone");

        align(y-z)
        ball(d=1/2*unit, anchor=z, $class="condyle bone"){
            align(x)
            ball(d=1/4*unit, anchor=x, $class="tibia bone")
            align(z)
            translate(2.5*unit*down)
            ball(d=1/4*unit, anchor=-z, $class="tibia bone");
        }
    }
}

There's another thing you might notice. Look at the distal bones on the limbs of a real skeleton (that is to say, look at the bones further out from the torso). These bones come in pairs. On the arms, we have the radius and ulna, and on the legs we have the tibia and fibula. These bones exist so that we can twist our feet and hands. We'll need to specify additional condyles for these bones.
module leg(){
    ball(d=1/2*unit, anchor=-x-y+z, $class="pubis"){
        align(-x+y)
        ball(d=1/4*unit, anchor=-y, $class="condyle")
        ball(d=1/2*unit, anchor=-y+z, $class="condyle"){
            ball(d=1/4*unit,            $class="femur");
        }
    }
    translate(2.5*unit*down)
    translate(1*inch*y)
    ball(d=1/4*unit, anchor=-y+z, $class="condyle bone"){

        align(y)
        ball(d=1/4*unit, anchor=-y, $class="condyle bone");

        align(x+y)
        ball(d=1/4*unit, anchor=x, $class="femur bone");

        align(y-z)
        ball(d=1/2*unit, anchor=z, $class="condyle bone"){
            color("blue")
            align(-x+y)
            ball(d=1/6*unit, anchor=-x+y, $class="fibula bone");

            align(x)
            ball(d=1/4*unit, anchor=x, $class="tibia bone")
            align(z)
            translate(2.5*unit*down)
            ball(d=1/4*unit, anchor=-z, $class="tibia bone"){
                color("green")
                align(-x+y)
                ball(d=1/6*unit, anchor=center, $class="fibula bone");
            }
        }
    }
}

One last thing before we go. While we're detailing the pelvis region, we should get around to rendering the coccyx/tail bone.
module pelvis(){
    rod(d=1/3*unit, h=unit, anchor=-x+z, $class="lumbar bone"){
        align(-y-z)
        ball(unit, anchor=-y+z, $class="ilium bone");

        align(-z)
        ball(unit, anchor=z, $class="ilium bone"){
            color("blue")
            translate(1/4*unit*(-x-z))
            ball(unit, anchor=center, $class="coccyx");

            align(-z, $class="crotch")
            children();
        }
    }
}

The tail bone looks a little odd, but remember - this is still just an approximation. The only thing that matters is that it's a better approximation than the one before.
Now let's switch to the arm:
arm();

The distal condyle of the humerus can be similarly broken into 3 parts. The ulna can also be offset a little bit, so that it aligns with the botttom ball of the distal humerus condyle.
module arm(){
    ball(d=1/4*unit, anchor=center, $class="humerus bone");

    translate(2*unit*y)
    ball(d=1/4*unit, anchor=center, $class="humerus bone"){
        ball(d=1/4*unit, anchor=z, $class="condyle bone");
        ball(d=1/4*unit, anchor=-z, $class="condyle bone");
        align(y){
            ball(d=1/4*unit, anchor=-y+z, $class="ulna bone");
            translate(1.75*unit*y){
                ball(d=1/8*unit, anchor=y+z, $class="ulna bone");
            }
        }
    }
}

Now distinguish the radius from the ulna:
module arm(){
    ball(d=1/4*unit, anchor=center, $class="humerus bone");

    translate(2*unit*y)
    ball(d=1/4*unit, anchor=center, $class="humerus bone"){
        ball(d=1/4*unit, anchor=z, $class="condyle bone");
        ball(d=1/4*unit, anchor=-z, $class="condyle bone");
        align(y){
            ball(d=1/4*unit, anchor=-y+z, $class="ulna bone");
            ball(d=1/8*unit, anchor=-y-z, $class="radius bone");
            translate(1.75*unit*y){
                ball(d=1/8*unit, anchor=y-z, $class="radius bone")
                assign($class="wrist")
                children();

                //hand
                ball(d=1/8*unit, anchor=y+z, $class="ulna bone");
            }
        }
    }
}

And here's what it looks like when we reapply the view:

Compared with the limbs, we find the torso is now waay under-detailed:
skeleton()
chest()
attach("waist")
pelvis();

As it turns out, the chest is a surprisingly complicated blob. We can't simply approximate it by a oblong spheroid. We can however model it by a series of cranial unit spheres.
module chest(){
    rod(d=1/3*unit, h=unit, $class="cervical bone"){
        align(-x-z)
        translate(-unit/2*z){
            //back
            color("green")
            ball(unit, anchor=-y+z, $class="ribs bone");

            translate(1.5*unit*y, $class="shoulder")
            children();
        }

        //center
        align(-z, $class="ribs bone")
        ball(unit){
            //front
            color("blue")
            align(x-z)
            ball(unit, anchor=z)
            ball(unit, anchor=-y)
            ball(unit, anchor=z);

            //bottom center
            align(-z)
            ball(unit)
            align(-z, $class="waist")
            children();
        }
    }
}

We are also missing the shoulder blades...
module chest(){
    rod(d=1/3*unit, h=unit, $class="cervical bone"){
        align(-x-z)
        translate(-unit/2*z){
            //back
            ball(unit, anchor=-y+z, $class="ribs bone")
            color("purple")
            align(-x-z)
            box(1/6*unit, anchor=-x-y, $class="shoulderblade");

            color("green")
            translate(3/2*unit*y)
            box(1/6*unit, anchor=x+y-z, $class="shoulderblade"){
                align(x-z, $class="shoulder")
                children();
            }
        }

        //center
        align(-z, $class="ribs bone")
        ball(unit){
            //front
            align(x-z)
            ball(unit, anchor=z)
            ball(unit, anchor=-y)
            ball(unit, anchor=z);

            //bottom center
            align(-z)
            ball(unit)
            align(-z, $class="waist")
            children();

            color("blue")
            align(-x+y)
            box(1/6*unit, anchor=-y, $class="shoulderblade");
        }
    }
}

aand colarbone.
module chest(){
    rod(d=1/3*unit, h=unit, $class="cervical bone"){
        align(-x-z)
        translate(-unit/2*z){
            //back
            ball(unit, anchor=-y+z, $class="ribs bone")
            align(-x-z)
            box(1/6*unit, anchor=-x-y, $class="shoulderblade");

            translate(3/2*unit*y)
            box(1/6*unit, anchor=x+y-z, $class="shoulderblade"){

                color("green")
                align(x-y+z)
                ball(1/6*unit, anchor=-x+y, $class="collarbone");

                align(x-z, $class="shoulder")
                children();
            }
        }

        //center
        align(-z, $class="ribs bone")
        ball(unit){
            //front
            align(x-z)
            ball(unit, anchor=z)
            ball(unit, anchor=-y)
            ball(unit, anchor=z);

            //bottom center
            align(-z)
            ball(unit)
            align(-z, $class="waist")
            children();

            color("blue")
            align(x)
            translate(1/6*unit*y)
            ball(1/6*unit, anchor=-y-z, $class="collarbone");

            align(-x+y)
            box(1/6*unit, anchor=-y, $class="shoulderblade");
        }
    }
}

The only thing left is to perform the hull over relevant primitives:
module skeleton(){
    color("white")
    hulled("ilium,pubis")
    mirrored(y)
    hulled("collarbone", $class="collarbone")
    hulled("shoulderblade", $class="shoulderblade")
    hulled("ribs", $class="ribs")
    hulled("ulna", $class="ulna")
    hulled("humerus", $class="humerus")
    hulled("femur", $class="femur")
    hulled("tibia", $class="tibia")
    children();
}

Here's where we stand, so far:

The head needs work. Let's turn off the skeleton view and focus in on the head:
head();

Oftentimes artists will adopt a smaller unit of measure when addressing the head. This unit of measure is the eye, and it is one fifth the diameter of the cranium.
Like the cranium, the eye is a near perfect sphere, however it is difficult to reference the eye when the head is viewed in profile. For this reason, we'll normally limit our use of the eye to object widths and (sometimes) heights.
When most people are asked to described the shape of a head, they think of an oval, maybe an egg. The cranium is a sphere, and the jaw sticks out to make the egg shape. We can take this to mean the jaw is the first thing we should work on.
The jaw itself is rectangular. Dimensions will differ from canon to canon, but it's about 3 eyes wide and 1 eye tall. Its lowest extent is 1 eye's distance beyond the bottom of the jaw. When you examine a skull in profile you'll see the rear of the jaw juts out a little bit from the cranium, maybe 1/5 unit.
module head(){
    ball(d=unit, anchor=-z, $class="cranium"){
        color("blue")
        align(-z)
        translated(1/5*unit*x)
        box([infinitesimal, 3*eye, eye], anchor=-x+z, $class="jaw")
        translate(1/2*unit*x)
        align(-z)
        ball(d=eye, anchor=x+z, orientation=x, $class="chin");

        align(-z)
        assign($class="neck")
        children();
    }
}

The eyes are another feature that can be easily positioned. As mentioned previously, the eyes are around one fifth the width of the cranium. The eyes are also conveniently placed one eye width apart, which leaves about an eye's worth of buffer on either side of the cranium. Within this buffer the eyes exert a certain influence on the shape of the skull.
Let's draw these spheres of influence. We'll align these spheres so that their top parts make contact with the center of the cranium. The spheres will be just just large enough for them to make contact with each other. Because the eyes are themselves 1 eye width apart, this means each sphere of influence will be 1.5 eye widths in length. When we finally hit build we'll find these spheres will very nicely trace the orbits of the eye. The eyeballs are obviously at the center of these spheres.
module head(){
    ball(d=unit, anchor=-z, $class="cranium"){
        color("blue")
        align(x)
        ball(1.5*eye, anchor=z, $class="orbit"){
            ball(eye, $class="eye");
        }
        align(-z)
        translated(1/5*unit*x)
        box([infinitesimal, 3*eye, eye], anchor=-x+z, $class="jaw")
        translate(1/2*unit*x)
        align(-z)
        ball(d=eye, anchor=x+z, orientation=x, $class="chin");
        align(-z)
        assign($class="neck")
        children();
    }
}

ast the orbit you'll find the zygomatic arch, which can be described by a second, larger sphere of nfluence that is emitted from the eye. Obviously, not all of this sphere is comprised of bone, since hat would block light out to the eye. There is a hole that is cut out from this sphere, and this hole s described by yet another collection of spheres.
module head(){
    ball(d=unit, anchor=-z, $class="cranium"){
        align(x)
        ball(1.5*eye, anchor=z, $class="orbit"){
            color("blue")
            ball(7/4*eye, $class="arch");

            color("green")
            ball(3/2*eye, anchor=-x, $class="socket")
            ball(3/2*eye, anchor=-y);

            ball(eye, $class="eye");
        }
        align(-z)
        translated(1/5*unit*x)
        box([infinitesimal, 3*eye, eye], anchor=-x+z, $class="jaw")
        translate(1/2*unit*x)
        align(-z)
        ball(d=eye, anchor=x+z, orientation=x, $class="chin");
        align(-z)
        assign($class="neck")
        children();
    }
}

Past this point things get trickier. It helps to have an existing 3D scan to help us out. You can download one such scan here
color([.2,.2,.2,0.5])
translate(-10*x +1.8*y -5*z)
rotate(27*y)
rotate((40.+90)*z)
import(".../skull_Fill_Build_Space.stl");

We now see a few inaccuracies with our model. First, we need a forehead. It is a complex shape - towards the front it is more rectangular. We will model this by a combination of 3 spheres: two in the front to form the rectangular portion, and an third oblong sphere in the back.
module head(){
    hide("socket")
    ball(d=unit, anchor=-z, $class="cranium"){
        color("blue")
        align(z)
        translate(1/8*unit*x)
        ball([1, 3/4, 1]*unit, anchor=z, $class="forehead");
        color("green")
        align(x)
        translate(1/2*eye*x+1/12*unit*y+1/2*eye*z)
        ball(2/3*unit, anchor=x, $class="forehead");

        align(x)
        ball(1.5*eye, anchor=z, $class="orbit"){
            ball(7/4*eye, $class="arch");

            ball(3/2*eye, anchor=-x, $class="socket")
            ball(3/2*eye, anchor=-y);

            ball(eye, $class="eye");
        }
        align(-z)
        translated(1/5*unit*x)
        box([infinitesimal, 3*eye, eye], anchor=-x+z, $class="jaw")
        translate(1/2*unit*x)
        align(-z)
        ball(d=eye, anchor=x+z, orientation=x, $class="chin");
        align(-z)
        assign($class="neck")
        children();
    }
}

The mouth should have greater presence. It is easier to model than the forehead. It is a sphere, 1/3 units in diameter. It's a half unit from the front of the mouth to the back of the jaw.
module head(){
    hide("socket")
    ball(d=unit, anchor=-z, $class="cranium"){

        align(z)
        translate(1/8*unit*x)
        ball([1, 3/4, 1]*unit, anchor=z, $class="forehead");

        align(x)
        translate(1/2*eye*x+1/12*unit*y+1/2*eye*z)
        ball(2/3*unit, anchor=x, $class="forehead");

        align(x)
        ball(1.5*eye, anchor=z, $class="orbit"){
            ball(7/4*eye, $class="arch");

            ball(3/2*eye, anchor=-x, $class="socket")
            ball(3/2*eye, anchor=-y);

            ball(eye, $class="eye");
        }

        align(-z)
        translated(1/5*unit*x)
        box([infinitesimal, 3*eye, eye], anchor=-x+z, $class="jaw")
        translate(1/2*unit*x){
            color("blue")
            ball(d=1/3*unit, anchor=x);

            align(-z)
            ball(d=eye, anchor=x+z, orientation=x, $class="chin");
        }

        align(-z)
        assign($class="neck")
        children();
    }
}

The chin should be smaller, as well. In our 3D scan, the chin takes on the form of a sphere. The top of the chin is 1 eye unit from the center of the mouth.
module head(){
    hide("socket")
    ball(d=unit, anchor=-z, $class="cranium"){

        align(z)
        translate(1/8*unit*x)
        ball([1, 3/4, 1]*unit, anchor=z, $class="forehead");

        align(x)
        translate(1/2*eye*x+1/12*unit*y+1/2*eye*z)
        ball(2/3*unit, anchor=x, $class="forehead");

        align(x)
        ball(1.5*eye, anchor=z, $class="orbit"){
            ball(7/4*eye, $class="arch");

            ball(3/2*eye, anchor=-x, $class="socket")
            ball(3/2*eye, anchor=-y);

            ball(eye, $class="eye");
        }

        align(-z)
        translated(1/5*unit*x)
        box([infinitesimal, 3*eye, eye], anchor=-x+z, $class="jaw")
        translate(1/2*unit*x){
            ball(d=1/3*unit, anchor=x)

            color("blue")
            translate(-eye*z)
            ball(1/2*eye,anchor=-x-y+z);

        }

        align(-z)
        assign($class="neck")
        children();
    }
}

Now the nose.
module head(){
    hide("socket")
    ball(d=unit, anchor=-z, $class="cranium"){

        align(z)
        translate(1/8*unit*x)
        ball([1, 3/4, 1]*unit, anchor=z, $class="forehead");

        align(x)
        translate(1/2*eye*x+1/12*unit*y+1/2*eye*z)
        ball(2/3*unit, anchor=x, $class="forehead");

        align(x)
        ball(1.5*eye, anchor=z, $class="orbit"){
            ball(7/4*eye, $class="arch");

            ball(3/2*eye, anchor=-x, $class="socket")
            ball(3/2*eye, anchor=-y);

            ball(eye, $class="eye");
        }

        align(-z)
        translated(1/5*unit*x)
        box([infinitesimal, 3*eye, eye], anchor=-x+z, $class="jaw")
        translate(1/2*unit*x){
            ball(d=1/3*unit, anchor=x){

                color("blue")
                align(x+z)
                ball(eye, anchor=x-z, $class="nose"){
                    align(y)
                    ball(1/2*eye, anchor=z);;

                    align(x)
                    ball(1/2*eye, anchor=center);
                }

                translate(-eye*z)
                ball(1/2*eye,anchor=-x-y+z);
            }

        }

        align(-z)
        assign($class="neck")
        children();
    }
}

The last major feature we'll add to the head is what's known as the zygomatic process. We notice from the 3D scan that if we take a ball 1.5 eye units wide and stick it on top of the rear jaw it conveniently aligns with the rear portion of the zygomatic process. The rest of the process is a series of sphere leading up to the cheeks.
module head(){
    hide("socket")
    ball(d=unit, anchor=-z, $class="cranium"){

        align(z)
        translate(1/8*unit*x)
        ball([1, 3/4, 1]*unit, anchor=z, $class="forehead");

        align(x)
        translate(1/2*eye*x+1/12*unit*y+1/2*eye*z)
        ball(2/3*unit, anchor=x, $class="forehead");

        align(x)
        ball(1.5*eye, anchor=z, $class="orbit"){
            ball(7/4*eye, $class="arch");

            ball(3/2*eye, anchor=-x, $class="socket")
            ball(3/2*eye, anchor=-y);

            ball(eye, $class="eye");
        }

        align(-z)
        translated(1/5*unit*x)
        box([infinitesimal, 3*eye, eye], anchor=-x+z, $class="jaw"){

            color("blue")
            align(y+z, $class="cheek")
            ball(3/2*eye, anchor=-z)
            align(x)
            ball(1*eye, anchor=center)
            align(x)
            ball(1/2*eye, anchor=center)
            align(z)
            ball(1/2*eye, anchor=center);

            translate(1/2*unit*x){
                ball(d=1/3*unit, anchor=x){

                    align(x+z)
                    ball(eye, anchor=x-z, $class="nose"){
                        align(y)
                        ball(1/2*eye, anchor=z);
                        align(y)
                        ball(1/2*eye, anchor=x-z, $class="cheek");

                        align(x)
                        ball(1/2*eye, anchor=center);
                    }

                    translate(-eye*z)
                    ball(1/2*eye,anchor=-x-y+z);
                }

            }
        }

        align(-z)
        assign($class="neck")
        children();
    }
}
Before we go, we'll add a few minor touches to the back of the skull. There will be a new rectangular primitive adjacent to the back of the jaw. We will also add the occiput, a protusion of the cranium at the back of the skull.
module head(){
    ball(d=unit, anchor=-z, $class="cranium"){

        color("blue")
        align(-x-z)
        translate(-1/32*unit*x + 1/16*unit*z)
        ball(1/2*unit, anchor=-x-z, $class="occiput");

        align(-x-z)
        translate(1/16*unit*y)
        ball(3/4*unit, anchor=-x-z, $class="occiput");

        align(z)
        translate(1/8*unit*x)
        ball([1, 3/4, 1]*unit, anchor=z, $class="forehead");

        align(x)
        translate(1/2*eye*x+1/12*unit*y+1/2*eye*z)
        ball(2/3*unit, anchor=x, $class="forehead");

        align(x)
        ball(1.5*eye, anchor=z, $class="orbit"){
            ball(7/4*eye, $class="arch");

            ball(3/2*eye, anchor=-x, $class="socket")
            ball(3/2*eye, anchor=-y);

            ball(eye, $class="eye");
        }

        align(-z)
        translated(1/5*unit*x)
        box([infinitesimal, 3*eye, eye], anchor=-x+z, $class="jaw"){

            align(y+z, $class="cheek")
            ball(3/2*eye, anchor=-z)
            align(x)
            ball(1*eye, anchor=center)
            align(x)
            ball(1/2*eye, anchor=center)
            align(z)
            ball(1/2*eye, anchor=center);

            translate(1/2*unit*x){
                ball(d=1/3*unit, anchor=x){

                    align(x+z)
                    ball(eye, anchor=x-z, $class="nose"){
                        align(y)
                        ball(1/2*eye, anchor=z);
                        align(y)
                        ball(1/2*eye, anchor=x-z, $class="cheek");

                        align(x)
                        ball(1/2*eye, anchor=center);
                    }

                    translate(-eye*z)
                    ball(1/2*eye,anchor=-x-y+z);
                }

            }
        }

        align(-z)
        assign($class="neck")
        children();
    }
}

At this point you might think that was a lot of work just to get a basic model of the skeleton. We still have yet to even begin work on the muscles! Muscles seem like such a hard thing to the uninitiated. They can't be modeled by simple spheres, as with the skeleton. They tend to weave in and out of one another, oftentimes in ways that are not immediately apparent. And there's so many of them! There are only 206 bones in the human body, but over 600 muscles!
I'm going to argue that rendering muscle is not as hard as you might think. This is for a number of reasons:
- Some muscles are hidden These are known as deep muscles. They appear very close to the bone. Superficial muscles lie very close to the skin. We're only going to concern ourselves with superficial muscles.
- Some muscles occur in groups These muscles have similar function and so tend to blend in with one another.
- Some muscles are bigger than others You only need to remember a few of the largest muscles to capture the majority of human musculature.
In short, we only need to concern ourselves with just a few of the largest and most noticeable muscle groups.
In addition, there are a number of principles that make memorizing key muscle groups easier. We'll go over some of those principles in the following sections.
###Muscles come in pairs
The body only moves through the contraction of muscle. Muscles never push - only pull. Now, if you move a part of your body, you generally have to be able to move it back, otherwise you might get stuck in an unrecoverable position. This means For every muscle, there is another muscle that can pull against it. This muscle is called the antagonist. This is great news - it means if you remember one muscle, you can generally guess where the other muscle has to be if it pulls in the opposite direction: muscles in the front antagonize the ones in the back. We can use this principle to easily remember muscles in the core of the body.
| Front | Back |
|---|---|
| [[https://raw.githubusercontent.com/davidson16807/relativity.scad/master/demos/body/muscle/pecs.abs.png | width=150px]] pecs,abs |
| [[https://raw.githubusercontent.com/davidson16807/relativity.scad/master/demos/body/muscle/mastoid.png | width=150px]] mastoid |
###Muscles in the arm match those in the leg
Long ago, there were these four legged creatures. These guys were our ancestors. They had some very simple body plans. The muscles in their forelimbs matched the ones in their hindlimbs. It made sense this way - nothing was so special about any pair of legs to require different muscles. Over time, the leg pairs differentiated and eventually the animals learned to walk upright. Some muscles may have been added or removed, but the overall layout remains much the same. In short, muscles in the arm have counterparts in the leg. We can use this principle to easily remember muscles in the arms and legs:
| Arm muscle | Leg muscle |
|---|---|
| [[https://raw.githubusercontent.com/davidson16807/relativity.scad/master/demos/body/muscle/deltoid.png | width=150px]] delts |
| [[https://raw.githubusercontent.com/davidson16807/relativity.scad/master/demos/body/muscle/biceps.png | width=150px]] biceps |
| [[https://raw.githubusercontent.com/davidson16807/relativity.scad/master/demos/body/muscle/triceps.png | width=150px]] triceps |
You may also notice something that was mentioned in the previous section - the triceps are the antagonist to the biceps, and the quads are the antagonist to the hamstrings. Our memory aids are reinforcing one another!
Sometimes, the body is space limited and it can't fit all the muscles near the part they're supposed to move, so muscles are sometimes stored offsite, in other body parts. When this is the case, tendons are used to communicate power across body parts, and ligament assumes the function of an attachment point. The ligament pins down the tendon, allowing it to slide up and down but not side to side. Let's take an example. You may think the finger muscles must all attach to somewhere in the hand. This is not the case at all. A number of finger muscles are stored in the upper forearm. Very long tendons are used to transfer power to the fingers. These tendons are wrapped by ligament in the wrist. Its almost like there's a very small but powerful set of muscles that attach near the wrist.
Let's see an example. Take a look at the back of your hand. As you do this, lift up your fingers one at a time. You'll notice a series of ridges that fan out from the center of your wrist. You might guess these are bones, but that's not the case - relax your fingers and feel out the bones of your hand. You'll notice they're in completely different locations from the ridges you saw. The ridges you saw earlier are tendons. The tendons in your hand are bundled together by ligment in your wrist, and that explains why they fan out in the way they do. The muscles that move the tendons are in your upper forearm.
You'll recall how muscles always have an antagonist. The antagonist to these muscles are on the opposite side. You can see the tendons to these muscles. All you have to do is move your fingers in the opposite direction - that is, towards your palm. The antagonist tendons will appear very faintly below your wrist.
###Upper body
###Lower body