In the previous Docker project, you've developed and deployed containerized service which detects objects in images sent through a Telegram chatbot. In addition, your service could effortlessly be launched on any machine using (almost) a single Docker compose command. Great job!
But how services are really deployed in the cloud? What about scalability? Consider if your service were to receive 30 images per second - would it effectively handle the load? Additionally, in the event of an accidental virtual machine shutdown, does your service stay available? does it maintain high availability?
In this project, you'll deploy your Polybot Service on AWS following best practices for a well-architected infrastructure. You'll utilize the majority of the AWS resources covered in the tutorials, including EC2, VPC, IAM, S3, SQS, DynamoDB, ELB, ASG, Lambda, CloudWatch, and more.
- Fork this repo by clicking Fork in the top-right corner of the page.
- Clone your forked repository by:
Change
git clone https://github.com/<your-username>/<your-project-repo-name>
<your-username>and<your-project-repo-name>according to your GitHub username and the name you gave to your fork. E.g.git clone https://github.com/johndoe/PolybotServiceAWS. - Open the repo as a code project in your favorite IDE (Pycharm, VSCode, etc..). It is also a good practice to create an isolated Python virtual environment specifically for your project (see here how to do it in PyCharm).
Later on, you are required to change the README.md file content to provide relevant information about your service project.
Let's get started...
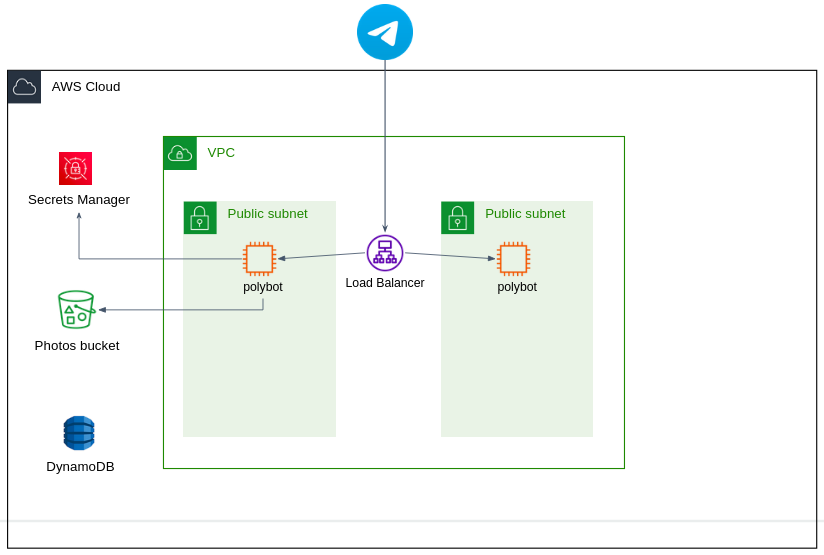
- If you don't have it yet, create a VPC with at least two public subnets in different AZs.
- During the project you'll deploy the Polybot Service in EC2 instances. For that, your instances has to have permission on some AWS services (E.g. for example to upload/download photos in S3). The correct way to do it is by attaching an IAM role with the required permissions to your EC2 instance. Don't use or generate access keys.
Warning
Never commit AWS credentials into your git repo nor your Docker containers!
-
The Polybot microservice should be running in a
microEC2 instance. You'll find the code skeleton underpolybot/. Take a look at it - it's similar to the one used in the previous project, so you can leverage your code implementation from before. -
The app should be running automatically as the EC2 instances are being started (in case the instance was stopped), without any manual steps.
There are many approached to achieve that. As a DevOps engineers, we prefer running the app as a Docker container, and make it run automatically using the
--restart alwaysflag, or as a Linux service.Furthermore, if you don't want to manually install Docker in each machine, you can utilize User Data or create an AMI from a single instance to replicate the setup across others.
-
The service should be highly available. For that, you'll use an Application Load Balancer (ALB) that routes the traffic across the instances located in different AZs.
The ALB must have an HTTPS listener, as working with HTTP is not allowed by Telegram. To use HTTPS you need a TLS certificate. You can get it either by: Generate a self-signed certificate and import it to the ALB listener. In that case the certificate
Common Name(CN) must be domain name (E.g.mydomain.click), and you must pass the certificate file when setting the webhook inbot.py(i.e.self.telegram_bot_client.set_webhook(..., certificate=open(CERTIFICATE_FILE_NAME, 'r'))). In the domain's Hosted Zone you should create a subdomain A alias record that routes traffic to your ALB. -
Read Telegram's webhook docs to get the CIDR of Telegram servers. Since your ALB is publicly accessible, it's better to restrict incoming traffic access to the ALB exclusively to Telegram servers by applying inbound rules to the Security Group.
-
Your Telegram token is a sensitive data. It should be stored in AWS Secret Manager. Create a corresponding secret in Secret Manager, under Secret type choose Other type of secret.
-
Tip: It's recommended to tag your Polybot instances, so they can be identified during the CI/CD pipline that you'll implement later. E.g.
APP=john-polybot.
- The Yolo5 microservice should be running within a
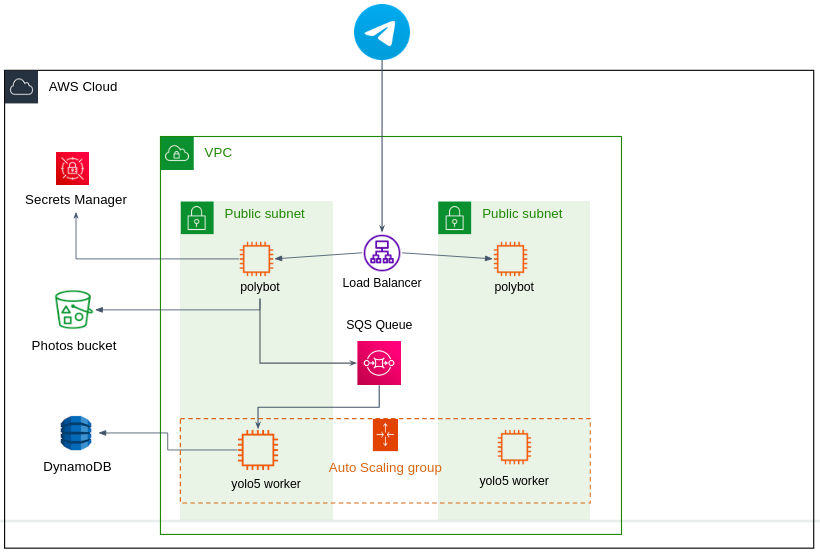
mediumEC2 instance. The service files can be found underyolo5/. Inapp.pyyou'll find a code skeleton that periodically consumes jobs from an SQS queue. - Polybot -> Yolo5 communication: When the Polybot microservice receives a message from Telegram servers, it uploads the image to the S3 bucket.
Then, instead of talking directly with the Yolo5 microservice using a simple HTTP request, the bot sends a "job" to an SQS queue.
The job message contains information regarding the image to be processed, as well as the Telegram
chat_id. The Yolo5 microservice acts as a consumer, consumes the jobs from the queue, downloads the image from S3, processes the image, and writes the results to a DynamoDB table (instead of MongoDB as done in the previous Docker project. Change your code accordingly). - Yolo5 -> Polybot communication: After writing the results to DynamoDB, the Yolo5 microservice then sends a
POSTHTTP request to the Yolo5 microservice, to/results?predictionId=<predictionId>, while<predictionId>is the prediction ID of the job the yolo5 worker has just completed. The request is done via the ALB domain address, but since this is an internal communication between theyolo5and thepolybotmicroservices, HTTPS is not necessary here. You should create an HTTP listener in your ALB accordingly, and restrict incoming traffic to instances from within the same VPC only. The/resultsendpoint in the Polybot microservice then should retrieve the results from DynamoDB and sends them to the end-user Telegram chat by utilizing thechat_idvalue. - The Yolo5 microservice should be auto-scaled. For that, all Yolo5 instances would be part of an Auto-scaling Group. Create a Launch Template and Autoscaling Group with desired capacity 1, and maximum capacity of 2 (obviously in real-life application it would be more than 2). The automatic scaling based on CPU utilization, with a scaling policy triggered when the CPU utilization reaches 60%.
- Similarly to the Polybot, the Yolo5 app should be automatically up and running when an instance is being started as part of the ASG, without any manual steps.
- Send multiple images to your Telegram bot within a short timeframe to simulate increased traffic.
- Navigate to the CloudWatch console, observe the metrics related to CPU utilization for your Yolo5 instances. You should see a noticeable increase in CPU utilization during the period of increased load.
- After ~3 minutes, as the CPU utilization crosses the threshold of 60%, CloudWatch alarms will be triggered. Check your ASG size, you should see that the desired capacity increases in response to the increased load.
- After approximately 15 minutes of reduced load, CloudWatch alarms for scale-in will be triggered.
We now want to automate the deployment process of the service, both for the Polybot and the Yolo5 microservices.
Meaning, when you make code changes locally, then commit and push them, a new version of Docker image is being built and deployed into the designated EC2 instances (either the two instances of the Polybot or all ASG instances of the Yolo5).
The process has to be fully automated.
While the expected outcome is simple, there are many ways to implement it.
You are given a skeleton for GitHub Action workflows for the Polybot and the Yolo5 under .github/workflows/polybot-deployment.yaml and .github/workflows/yolo5-deployment.yaml respectively.
Beyond the provided YAMLs, you are free to design and implement your CI/CD pipeline in any way you see.
Here are some suggestions:
- Build phase: Use GitHub Actions to build and push new version of Docker images to DockerHub or ECR (as done in the previous Docker project).
- Build phase: Use AWS CodeBuild to build images.
- Deploy phase: Create a custom bash script that lists instances of both Polybot and Yolo5 (use tags to do it). For each instance, connect via SSH and execute commands to pull the new version of the Docker image, stop the existing running container, and start the new version of the image.
- Deploy phase: Use AWS CodeDeploy to manage the deployment process.
- Deploy phase: Create a new Launch Template version with custom User Data to run the new image version when a new instance is being launched. Then, perform an instance refresh to update instances in your ASG.
Test your CI/CD pipline for both the Polybot and Yolo5 microservices.
You have to present your work to the course staff, in a 10-15 minutes demo. Your presentations would be evaluated according to the below list, in order of priority:
- Showcasing a live, working demo of your work.
- Demonstrating deep understanding.
- Applying best practices and clean work.

