-
Notifications
You must be signed in to change notification settings - Fork 47
6. Deprecated: Developing the API (v1‐v2)
If you just want to use the REopt API (and not modify the code or host the API on your own server) then you can access our production version of the API via the NREL Developer Network.
This guide for modifying the code to build additional functionalities you desire. Please take a look at the The structure of the API to get an overview of the full software stack before getting started with code-modifications. Also, you will need to have the code downloaded and development environment set-up on your machine to be able to make modifications. For installation instructions refer to Installing the API guide.
At last, if you would like your modifications (bug-fixes or new features) to be included in the tool, please refer to the Contributing to REopt document.
In this guide, a feature development process is described. Firstly, in a succinct step-by-step format and then a detailed process is presented with an example model where the following questions are answered:
NOTE: Following the suggestions provided in Development Guidelines section will help your development process get streamlined and effective.
NOTE: always remember to activate the virtual environment before working on the REopt code! See Installing the API document for the process of activating the virtual environment.
-
Develop the model on paper and gather the following information:
- What information is required in and out of the model?
- Define the exact set of new inputs and their interactions (i.e., if one set is defined, perhaps another one is not required?)
-
Decide where the model will reside?
- Does it fit within an existing application (i.e. reo, resilience_stats, proforma, etc.)?
- Or do you need to create a new applications/end-point for it?
-
Create a new branch off of the develop branch (develop is either of your local clone or fork - depending on whether you plan to contribute back to the REopt API).
-
Create a new unit test within the application folder where the code will reside.
-
Write the outline of the test which will drive the code you write.
-
Keep updating the test as you develop the feature further.
NOTE: Unit test is helpful in multiple ways. The test (or more appropriately the skeleton of the unit test in the beginning), when complete, will serve as the test-bed to prove that your new feature does what your mathematical formulation says. But during the process of development, keep running the test at various stages- the error messages are very helpful in debugging as you develop!
-
-
Add new inputs and outputs in the respective .py files - inputs and outputs.
-
Are there inputs/outputs that need to be saved in the database? Add them to models, and then migrate the database.
NOTE: whenever a new input or output is added to REopt, it is necessary to add it to the database using the following two commands:
Assuming your terminal is open in the MY-API-FOLDER (the folder is described here):
python manage.py makemigrationsAfter running the above command, you will find an automatically created .py file in migrations folder for the new input/output. Then run the following command to migrate the database:
python manage.py migrate -
In scenario builder, setup the technology and/or load representations defined in the previous step. Scenario builder is called every-time API is called.
-
Update the data-manager so that the JuMP optimization kernel receives the information from the newly created model in a format it currently understands.
-
Update the optimization kernel (JuMP model) with the additional constraints you have formulated for the feature, using the variable names that were defined in the data-manager. Add additional outputs which come with the new feature at the end of the JuMP code.
-
Parse outputs from the optimization kernel in the resulting post-processing module, make sure that the newly created outputs are added to nested_outputs.py (Step 5 above)
-
Test that the full information flow works within your test case (using the same unit test that was created in Step 4)
-
Run the full test-suite of REopt API using
python manage.py testto make sure that the newly created feature has not impacted the existing functionalities of the toolNOTE: If you are planning to contribute back to the REopt repository, running the full test-suite to show that your enhancement doesn't break existing features is necessary. Even if you don't plan to send a Pull Request, running the full test-suite after completing the feature is a great idea for sanity checking the new feature.
To answer the questions posed in the beginning of this guide in the context of the steps defined above, consider a case study where the objective is to add thermal load into the REopt API. In this situation, the problem definition (for modifying the code to add new feature) can be laid out as follows.
- Define a new set of inputs, grouped as LoadProfileThermal
- Inputs that allow specification of thermal load (possible as two separate loads, heating, and cooling), as time series, annual, or monthly values
- Inputs that allow specification of critical loads in outage events
- Add the inputs into the API and the database
- Add the inputs to the data_manager
- Add them to the JuMP optimization kernel
- Retrieve relevant outputs from the JuMP module and channel them back to the final outputs
NOTE: this guides assumes that at this point you have the mathematical model for the feature under development pinned down. The process described here is for coding the model in this software stack. For getting familiar with REopt's Mixed-Integer-Linear-Programming formulation, refer to the Mathematical formulation document.
In this step, determine the information required to be fed into the model. We are defining LoadProfileThermal as the new feature. It is intended to add thermal load to REopt (the current version only models electric loads). Figure 1 shows an example sketch for determining the input variable options and names. It is important to define the exact set of new inputs and their interactions (notice the use of OR in the second block of Figure 1 to understand the interactions).
Also, note that the good variable names for the REopt code would be descriptive, with units at the end. API inputs follow the snake-case convention (lower case words separated by underscores).
NOTE: as an exception - for the optimization kernel (JuMP model), the variable name convention is CamelCase.
The Structure of the API document enlists various endpoints in the REopt API. These endpoints are developed to modularize the framework for performing well-defined sub-tasks relatively independently. reo is the primary endpoint for running REopt API. Figure 2 shows where LoadProfileThermal model is planned to reside within the reo endpoint.
Before proceeding with the following steps, make sure that you have branched out from your local develop branch. Run the following commands in the terminal for the same (assuming you are in MY-API-FOLDER):
`git branch`
If the branch is develop, then pull the latest from the remote develop using the following command (if your goal is keep your feature branch updated with the latest development version):
`git pull remote develop`
Now create a new feature branch (and check it out in parallel) with the name of your choice using the following command:
`git checkout -b <feature-branch-name-without-spaces>`
NOTE: you may want to periodically merge the updates from remote develop to your feature branch. Be on lookout for merge conflicts when you do so! Refer to this git-cheatsheet for learning commands for the periodic updates and more.
REopt API strongly recommends test driven development methodology. So,creating a new test dedicated to check the functionality of the new feature is very important. Figure 3 shows the sub-folder under reo endpoint, where you will be adding the new test. Note that the test file names start with test and rest of the words in the test filename are descriptive of the functionality being tested.
The quickest way to get started with writing the test is to copy an existing test file, and rename it (to test_thermal_load for this example). Inside the file, make sure to rename the class name (to ThermalLoadTest for this example) and delete all the old tests (the functions starting with def).
Throughout the development process, you wil be coming back to this test. By updating the input data (Which may be a json post) with the new inputs you have defined, you will be able to check the functionality as you write various pieces of code to model it from end-to-end. At the end, you will update the expected and obtained values at the end of the test to compare the actual output with how you expect the model to perform.
Steps (with snapshots of the example code):
- Add new inputs and outputs:
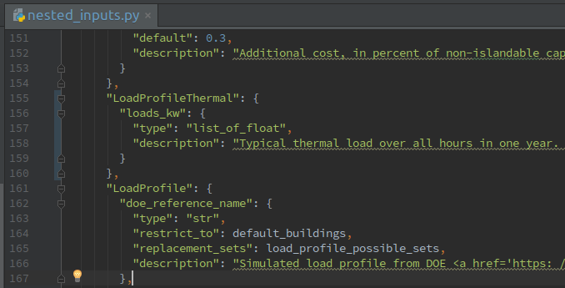
As shown in Figure 4 above, a new group named LoadProfileThermal is created under the Site nesting in nested_inputs.py file. A new variable named loads_kw is created that takes in the time-series input.
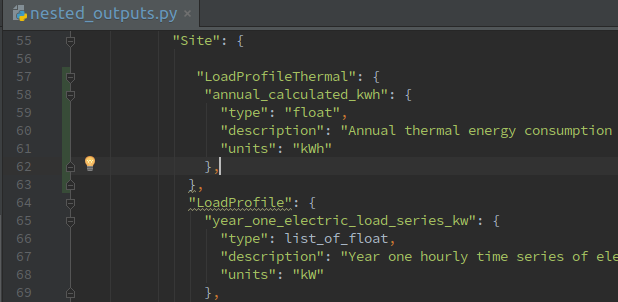
As shown in Figure 5 above, a new group is created in nested_outputs.py under the Site nesting, named LoadProfileThermal. A variable named annual_calculated_kwh is created under this group. This variable change should also be updated in nested_to_flat.py.
NOTE: notice that the variable name is descriptive enough to convey the information being held in it, it is also appended with kwh to keep track of the unit.
- Create/update unit test
This step is being repeated here to show the snapshots and emphasize on the utility of the error messages which the incomplete unit test throws.
When the new input is defined, add it to the unit test post, as shown in Figure 6 below:
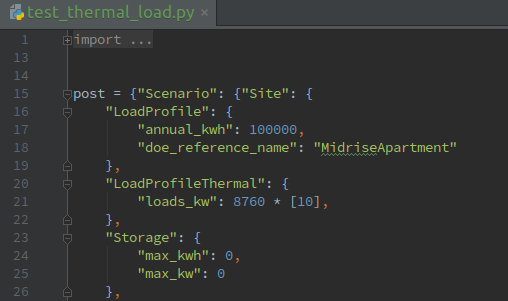
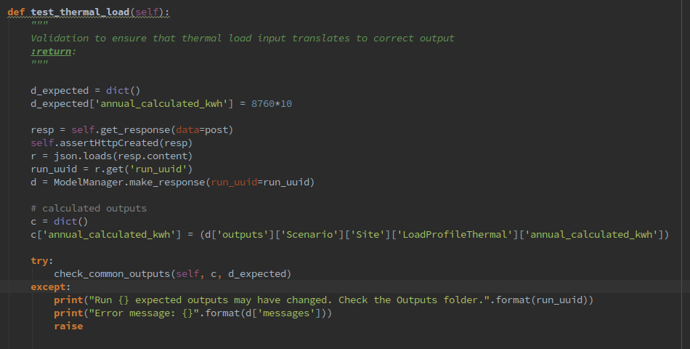
Then create a new test function within the unit test file, as shown in Figure 7 below:
Now when you run the test using:
python manage.py test reo.tests.test_thermal_load.ThermalLoadTest
It will fail. And that's okay. The purpose of running the test before coding the complete feature is to get a feel of missing components by looking at the error messages. See if you find the error message in Figure 8 to be somewhat intuitive!

NOTE: when you make changes to the code in your newly created feature branch, make sure to add and commit the pieces your are coding often. The common workflow is to check the status (using
git status), add the new files (usinggit add <file-name with relative path>), and commit them (usinggit commit -m "<succinct yet relevant commit message>"). When you check the status, it shows exactly which new files are added and which ones are modified, see the snapshot in Figure 9 below:
- Update models
When a new variable is created that needs to be saved to the database, it must be added to models. models.py is the crux of the Django database interaction. Figure 10 shows an example of adding this new LoadProfileThermal model to models.py:
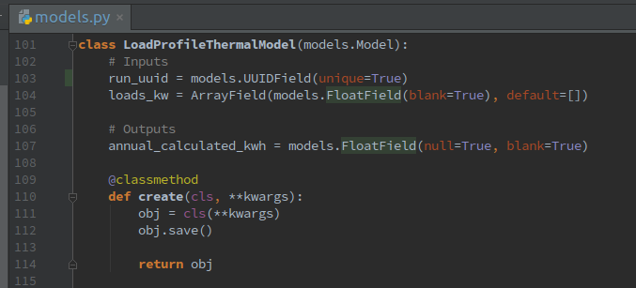
Then update the make_response function in the same file by adding LoadProfileThermal to the site_keys list, as shown in Figure 11 below:

At last, migrate the database.
NOTE: before executing the following migration commands, make sure that you are on local database by running the following command:
$APP_ENV
if the output islocal- you are good.
Run the following two commands:
python manage.py makemigrations
python manage.py migrate
- Update technology and/or load representation
The technology models in REopt are constructed in techs.py and if any technology is added in the feature (for the example being discussed here, there is no new generation technology, it is only a new type of load being added).
For the case when a new technology is added, you may need to code custom steps, such as construction of a production factor list (called prod_factor)from a resource data api, or create time-series load data from profiles or annual inputs. To add such functions, new .py files of these technology models can be added to My-API-FOLDER/reo/src folder.
Following up on the current example (LoadProfileThermal), we will add a file, My-API-FOLDER/reo/src/load_profile_thermal.py to house a customized model for thermal load. See Figure 12 below for the code-snippet of load_profile_thermal.py. This class takes in the user input profile (if given), otherwise constructs list of zeros. Then the annual total thermal load is calculated. Notice, a dfm input is passed to the LoadProfileThermal function, which is a DataManager object. A method named add_thermal_load needs to be added to data_manager.py.
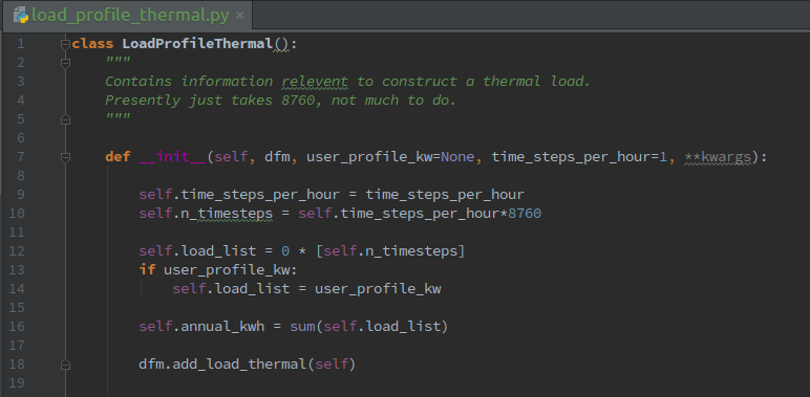
- Update scenario builder
scenario.py initializes all the relevant models for the current scenario (which is specified in the input post).
First, import the LoadProfileThermal model created in the previous step using:
from reo.src.load_profile_thermal import LoadProfileThermal
Then create an object for holding the output from the LoadProfileThermal model, as shown in Figure 13:

NOTE: Internal variables which weren't provided as inputs but were calculated within the feature model (for example annual_kwh in this case) may also need to saved in the database for retrieval during post-processing phase. There a couple of options to propagate such variables to the final results:
- Have the optimization kernel (JuMP model) calculate this variable and return it to the post-processing module along with other outputs.
- Alternatively, pass on the variable (along with its value) to the JuMP model (
reopt.jlfile) by adding it to the data_manager.py, this value can then be retrieved in the post-processing module. - OR, save the internal variable to the database within scenario.py (this option is shown in Figure 13 above). But it is important to note that database calls within scenario.py increase the execution time. Therefore, it option isn't recommended.
- Update data manager
Make sure that the new input variables make it to data_manager's reopt_inputs and reopt_inputs_bau dictionaries as shown in the Figure 14 below. These inputs are passed on to the optimization kernel (JuMP model).
- Modify JuMP model
Add/modify the variables, constraints, objective function, and output variables in this model based on your mathematical formulation. Refer to Mathematical formulation document for further details.
- Update result post-processing module
Add another elif clause to read back the results from JuMP Model (Figure 15 below)
NOTE: At this point, the feature is complete. Now run the unit test again. Don't be surprise if the test doesn't pass. Read the error message. You will almost certainly have to debug errors before the feature becomes functional as you desire it to, both in python modules and the JuMP model.
Once the feature development is complete and the code is running without hiccups, run the new unit test you wrote previously using python manage.py test reo.tests.test_thermal_load.ThermalLoadTest. Make sure that the expected output matches with the actual one.
After that, run the complete test-suite using python manage.py test. If all the tests are passing in the suite, that means your feature is behaving as intended (and not impacting the functionality of other features inadvertently).
• Have a solid plan on paper before starting to code; i.e. the mathematical model and clearly defined inputs and outputs.
• Fork off of the repository and the clone your fork locally (read through the details provided on Docker Setup page)
• Use Test Driven Development
-
To flesh out the workflow as you develop
-
To ensure full operation of the model with the code you are adding
-
To leave yourself with defined access into the code of interest
-
To give other developers a way to test if they have broken your code
• Don't forget to the migrate the database whenever you add new inputs or outputs to the model
• Commit often; use succinct yet relevant commit messages
• Issue a pull request into original repository when ready for review