Optionally back-up old C: drive using Macrium Reflect.
Make Windows Setup USB.
- Make an extras folder on USB
- Extras: e7z, office ISO, activation
- Download network drivers [https://dlcdnets.asus.com/pub/ASUS/mb/04LAN/DRV_LAN_Intel_I225_SZ-TSD_W10_64_V10214_20211019R.zip]
- Make a drivers folder on USB
- Copy network card driver zip to USB
Make BIOS flashback USB using existing PC.
- Download BIOS firmware update [https://dlcdnets.asus.com/pub/ASUS/mb/BIOS/ROG-STRIX-B550-A-GAMING-ASUS-2803.zip]
- Make USB use MBR using Rufus
- Name RSB550AG.CAP using BIOS Renamer (included in bios download)
- Copy CAP to root of USB (not inside any folder)
Offline the PC. Unplug all external cables. Unplug relevant cabling to components.
- CPU power (near top and left)
- Motherboard power (near right side)
- GPU power
- SATA data (usually near bottom right)
- Front IO connectors
- HD Audio connectors
- USB motherboard connectors
- Remove GPU
- Remove old motherboard. Usually 8 screws
- Remove old IO shield
Set motherboard on top of anti-static ESD bag that the motherboard came in if you need to set it down.
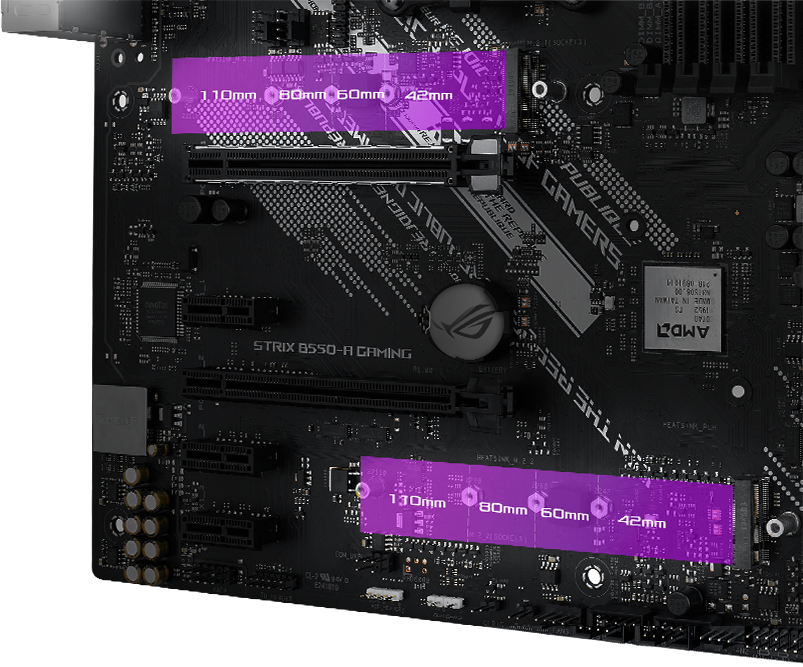
NVMe install
- Remove aluminium NVMe cover plate (near bottom right)
- Install NVMe stand-off screw into hole for 2280 (80mm) NVMe [https://dlcdnwebimgs.asus.com/files/media/2769A830-9807-4688-BE34-D9E7402BF48D/v1/img/connectivity/m.2.png]
- Install NVMe in to slot like a laptop ram stick
- When it's all the way in you won't be able to see copper contacts
- Install tiny screw that comes with NVMe standoff onto standoff
- When standoff screw is installed proper NVMe will be level with motherboard
- Peel plastic from thermal pad on underside of NVMe cover plate
- Re-install NVMe cover plate
CPU install
- Do not touch IHS or metal center of CPU if you can help it.
- When installing AM4 CPU be careful with the pins on the underside of the CPU.
Use the triangle trick to orient CPU correctly. Optional video [https://youtu.be/oqWAtk5emNs?t=133]
- Find the corner with a pressed triangle on the CPU socket (bottom left)
- Find the corner with a gold triangle on CPU (bottom left)
- The two triangles should be in the same corner Press the CPU socket lever and slide it away from the socket a bit to open the socket. Drop CPU into socket. It will drop straight down into the socket with no pressure. Lower and slide the CPU socket lever around the latch to lock it in place.
CPU cooler install. Take your time! AM4 coolers can be annoying.
Note the metal backplate on the backside of the motherboard. Set the motherboard interior white box out of the packaging if you have it. Set the anti-static ESD bag into the box. Set the motherboard on ESD bag.
Remove the four screws holding the two plastic brackets on the sides of the CPU socket.
- Remember that the metal backpate can fall out of the motherboard at this point
Orient the cooler so that it's cable connector can reach the CPU_FAN header on the motherboard. Orient the cooler so that it's cable is not in the way of the RAM.
Place the CPU cooler onto the four screw holes that we removed the two plastic brackets from. Screw just a little on each because it will lean if you screwed one stud all the way. Repeat the last step until finger tight. You do not want to make it wrist tight.
Plug in CPU connector to CPU_FAN header on motherboard. (near top right)
Ensure that you have the CPU power cable inserted through the top left of the case cable management section. Consider moving motherboard power and frontpanel connectors back into cable management section.
It's fine to pick up the motherboard by the sides of the CPU cooler heatsink. In most cases there will be one standoff that is actually a peg not a screwhole. Check to make sure your standoffs are in the right place in the case. The screws for the standoffs go into holes surrounded by stripes.
Place the motherboard into the case
- Line up the peg standoff and slide the motherboard into the case with the IO panel in first
- The motherboard may need a little pressure against the case to get the standoffs lined up Screw the motherboard screws into the standoffs
- Usually 8 screws for this new motherboard's size
Connect front panel connectors from case to motherboard header
- For the power/reset/activity led refer to your motherboard manual for where
- [https://dlcdnets.asus.com/pub/ASUS/mb/SocketAM4/ROG_STRIX_B550-A_GAMING/E17120_ROG_STRIX_B550-A_GAMING_UM_v2_WEB.pdf] Connect HD Audio connector (near bottom left). Connect USB2 connector (near bottom/bottom left). Connect USB3 connector (near motherboard power). Connect PSU cables to CPU and motherboard headers. CPU needs either 8 pin or 4 pin power
- Don't fill both CPU PSU headers
Have your CPU and RAM installed at least
Prep motherboard for BIOS Flashback
- Plug BIOS Flashback USB into USB port with the square around it
- Hold BIOS Flashback button for 3sec
- Wait about 5 minutes or until light stops blinking
- Unplug USB
GPU, GPU power, SATA data.
Install Windows from USB
- Unplug all SATA
- Plug in USB with Windows Setup
- Boot USB as boot disk
- Follow steps in Windows Setup
- After Windows Setup reboots unplug USB