数据绑定
ArgoUI提供数据绑定功能,构造model数据,并绑定View,即可通过修改model值更新UI。
--声明model
model(userData)

ui{
    --layout views

}

local function preview()
    --构造model数据
endmodel(userData)--[model名].[属性名],如:
model(userData)
ui {
Label().text(userData.name),
ImageView().image(userData.avatar)
.width(50)
.height(50)
}
function preview()
userData.name = "MlnUI"
userData.avatar = "https://s.momocdn.com/w/u/others/2019/10/18/1571393657050-mls_header.png"
end当被观察的model值修改时,将会执行回调中的语句,返回model修改后的值。
--使用 watch(var, function(new) end)) 观察对象
--实现:EditTextView输入文本内容不为空则显示清空按钮,为空则隐藏清空按钮。
model(SearchBarModel)
---
--- UI
ui {
    --- layout views
    HStack()
    .bgColor(Color(0x999999))
    .cornerRadius(50)
    .padding(0, 20, 0, 20)
    .widthPercent(100)
    .crossAxis(CrossAxis.CENTER)
    .subs(
        EditTextView(SearchBarModel.text).singleLine(true)
        .basis(1)
        .textColor(Color(0xffffff)).left(5).right(10)
        .placeholderColor(Color(0x6e6e6e)).placeholder("请输入")
        .padding(15, 10, 15, 10)
        .setEndChangedCallback(function(text)
            if text == SearchBarModel.text then
                return
            end
            SearchBarModel.text = text
        end)
        ,
        ImageView()
        .width(24)
        .height(24)
        .display(false)
        .image("https://s.momocdn.com/w/u/others/custom/lua/vchat/movie/icon-clear.png")
        .onClick(function()
            SearchBarModel.text = ""
        end)
        .watch(SearchBarModel.text, function(new)
            --观察SearchBarModel.text
            print("watch->SearchBarModel.text=", new)
            self.display(#new ~= 0)
        end)
    )
}.safeArea(SafeArea.TOP)

---
--- preview
local function preview()
    SearchBarModel.text = ""
end当bind函数中被观察的model修改时,将会执行函数中的语句。
--使用 bind(function()  end) 绑定函数

WHITE = Color(255, 255, 255, 1)
PURPLE = Color(100, 100, 200, 1)

model(userData)
mLabel(str) {
    Label(str).padding(12, 18, 12, 18)
    .left(10)
    .bgColor(PURPLE)
    .textColor(WHITE)
}

---
--- UI
ui {
    --- layout views
    HStack().top(100)
    .crossAxis(CrossAxis.CENTER)
    .subs(
        ImageView(userData.avatar)
        .width(50)
        .height(50)
        --使用 bind(function()  end) 绑定函数
        .bind(function()
            --当userData.showAvater值改变时,将执行 display 方法。
            self.display(userData.showAvater)
        end)    .ID(img)
        ,
        Label(userData.name).left(10)
        ,
        mLabel("点我隐藏头像")
        .onClick(
            function()
                userData.showAvater.toggle()
                if userData.showAvater then
                    self.text("点我隐藏头像")
                else
                    self.text("点我显示头像")
                end
            end)
    )

}

---
--- preview
function preview()
    userData.name = "MlnUI"
    userData.avatar = "https://s.momocdn.com/w/u/others/2019/10/18/1571393657050-mls_header.png"
    userData.showAvater = true
end
⚠️注意:
1. 初始化时,会走bind回调,不会走watch回调。
2. bind监听function中被修改的model。watch(var,func)监听var。
3. watch 回调 和值是否改变无关。
4. 如修改的是数组list,bind中去使用list[pos] 或 list[pos].key 是不会被监听的,bind不会走。
该情况下 使用 watch(list,function(new) end)实现。复制如下demo查看bind、watch的效果:
model(uData)
---
--- UI
ui {
--- layout views
Label("label")
.width(100)
.height(100)
.bgColor(Color(0xaadd00))
--.bind(function()
-- self.text(uData.list[1].name)
--end)
.watch(uData.list,function(new)
self.text(uData.list[1].name)
end)
.onClick(function()
uData.list[1] = { name = "update", age = 66 }
end)
}
---
--- preview
local function preview()
uData.list = {
{ name = "11", age = 20 },
{ name = "22", age = 30 }
}
end--1.bindData方法绑定
--List().bindData(userData.list)
--2.构造方法传入model
--List(userData.list)
--demo如下:
WHITE = Color(255, 255, 255, 1)
PURPLE = Color(100, 100, 200, 1)
model(userData)
mLabel(str) {
Label(str).padding(12, 18, 12, 18)
.left(10)
.bgColor(PURPLE)
.textColor(WHITE)
}
mCell(item) {
mLabel(item.title)
}
---
--- UI
ui {
List()
.height(250).top(10)
.bgColor(PURPLE)
.bindCell(function(item)
return mCell(item)
end)
.bindData(userData.list)
}
---
--- preview
function preview()
local data = {}
for i = 1, 5 do
local temp = {}
temp.title = "第" .. i .. "行"
data[i] = temp
end
userData.list = data
end
model(tableModel)

mLabel(str, bgColor) {
    Label(str)
    .textColor(Color(255, 255, 255, 0.8))
    .padding(3, 5, 3, 5)
    .bgColor(bgColor)
    .fontSize(10)
}
---
--- UI
ui {
    --- layout views
    HStack()
    .widthPercent(100)
    .bgColor(Color(220, 230, 200, 1))
    .subs(
        tableModel.list.forEach(function(item, index)
            --item:model中第index个元素
            --index:下标
            return mLabel(item.text, item.color)
        end)
    )
}

---
--- preview
local function preview()
    tableModel.list = {
        { text = "0元配送", color = Color(100, 100, 200, 0.8) },
        { text = "支持自取", color = Color(100, 120, 200, 0.8) },
        { text = "食无忧", color = Color(140, 120, 200, 0.8) },
        { text = "津贴2元", color = Color(180, 150, 100, 0.8) },
        { text = "会员专享", color = Color(180, 100, 100, 0.8) },
        { text = "首单立减", color = Color(150, 60, 100, 0.8) }
    }
end
点击展开完整demo
WHITE = Color(255, 255, 255, 1)
PURPLE = Color(100, 100, 200, 1)

model(userData)

mLabel(str) {
    Label(str).padding(12, 18, 12, 18)
    .left(10)
    .bgColor(PURPLE)
    .textColor(WHITE)
}

mCell(item) {
    mLabel(item.title)
}
---
--- UI
ui {
    --- layout views
    VStack().subs(

        HStack().top(100)
        .crossAxis(CrossAxis.CENTER)
        .subs(

            ImageView(userData.avatar)
            .width(50)
            .height(50)
            .bind(function()
                --当userData.showAvater值改变时,将执行 display 方法。
                self.display(userData.showAvater)
            end)    .ID(img)
            ,
            Label(userData.name).left(10)
            ,
            mLabel("点我隐藏头像")
            .onClick(
                function()
                    userData.showAvater.toggle()
                    if userData.showAvater then
                        self.text("点我隐藏头像")
                    else
                        self.text("点我显示头像")
                    end
                end)
        )
        ,
        List().ID(list)
        .height(250).top(10)
        .bgColor(PURPLE)
        .bindCell(function(item)
            return mCell(item)
        end)
        .bindData(userData.list)
    )
}

---
--- preview
function preview()
    userData.name = "MlnUI"
    userData.avatar = "https://s.momocdn.com/w/u/others/2019/10/18/1571393657050-mls_header.png"
    userData.showAvater = true
    local data = {}
    for i = 1, 5 do
        local temp = {}
        temp.title = "第" .. i .. "行"
        data[i] = temp
    end
    userData.list = data
end
1. 打包生成model
打包成功后,会在工程目录中生成对应的lua文件和OC类及java类。
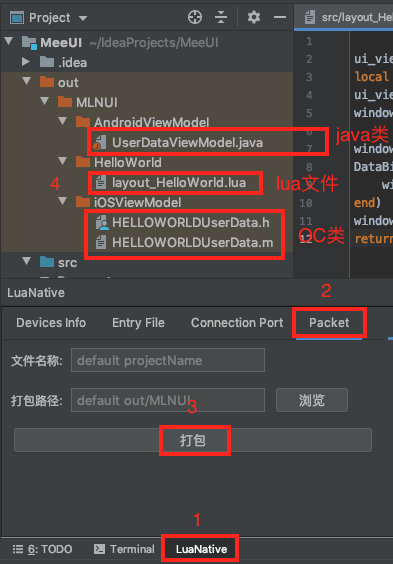
2. 使用
- 将打包生成的
lua文件和java类拷贝到Android工程中 - 新建
Activity加载这个lua文件
FrameLayout frameLayout = new FrameLayout(this);
setContentView(frameLayout);

instance = new MMUIInstance(this, true, true);
instance.setContainer(frameLayout);

InitData initData = new InitData("file://android_asset/model.lua");
instance.setData(initData);
- 绑定数据源
--使用打包生成的javaBean,构造数据源
UserData data = new UserData();
data.setName("MlnUI");
data.setAvatar("https://s.momocdn.com/w/u/others/2019/10/18/1571393657050-mls_header.png");

ObservableList<StuData> list = new ObservableList<>();
for (int i = 1; i < 6; i++) {
     StuData stu = new StuData();
     stu.setTitle("第" + i + "行");
     list.add(stu);
}
data.setList(list);
--绑定数据源
MMUIBinding binding = new MMUIBinding(instance);
binding.bind("userData", data);
-
将打包生成的
lua文件和OC类拷贝到iOS工程中 -
加载
lua文件
NSString *entryfile = @"demo.lua";
MLNKitViewController *viewController = [[MLNKitViewController alloc] initWithEntryFilePath:entryfile];
- 绑定数据源
--bindData  绑定数据
self.model  = [self buildModel];
[viewController bindData:self.model forKey:@"userData"];

--构造数据源
-(NSMutableArray *)buildModel{

        MLNUIDEMOTESTUserData *model = MLNUIDEMOTESTUserData.new;
        model.name = @"MlnUI";
        model.avatar = @"https://s.momocdn.com/w/u/others/2019/10/18/1571393657050-mls_header.png";

        NSMutableArray  *array =  NSMutableArray.new;
        for (int i = 1; i < 6; i++) {
            MLNUIDEMOTESTUserDatalist *item = MLNUIDEMOTESTUserDatalist.new;
            item.title = [NSString stringWithFormat:@"第%d行", i];
            [array addObject:item];
        }

        model.list =  array;
        return model;
    }
- push页面
[self.navigationController pushViewController:viewController animated:YES];