We read every piece of feedback, and take your input very seriously.
To see all available qualifiers, see our documentation.
Have a question about this project? Sign up for a free GitHub account to open an issue and contact its maintainers and the community.
By clicking “Sign up for GitHub”, you agree to our terms of service and privacy statement. We’ll occasionally send you account related emails.
Already on GitHub? Sign in to your account
原文地址:http://blog.csdn.net/bingqingsuimeng/article/details/44451481
经过上面的文章学习,和js面向对象以及自定义事件的学习,自己总结并实现了不用jquery的混入,用js的原型继承来写javascript的组件化。 先来看看我们实现组件的样子:
<!-- html -->
<input type="text" id="input">
<!-- javascrip -->
var input = $('#input');
funcrion getNum() {
  return input.val().length;
}
function render() {
  var num = getNum();
  if($('#input_count').length == 0) {
      input.after("<span id='input_count'></span>");
  }
  $('#input_count').html(num + "个字");
}
input.on('keyup', function() {
  render();
})

render();
<!-- javascrip -->
var textCount = {
  input: null,
  init: function(config) {
    this.input = $(config.id);
    this.bind();
    return this;
  },
  getNum: function() {
    return this.input.val().length;
  },
  bind: function() {
    var self = this;
    this.input.on('keyup', function() {
        self.render();
    })
  },
  render: function() {
    var num = this.getNum();
    if($('#input_count').length == 0) {
        this.input.after("<span id='input_count'></span>");
    }
    $('#input_count').html(num+'个字');
  }
}
textCount.init({
  id: '#input'
}).render();
getNum和bind是设为私有,可以避免其他代码的修改而导致的错误。
var textCount = (function(){
  var _getNum = function(that) {
    return that.input.val().length;
  }
  var _bind = function(that) {
    that.input.on('keyup', function() {
      that.render();
    })
  }

  var textCountFun = function(config) {}

  textCountFun.prototype.init = function(config) {
    this.input = $(config.id);
    _bind(this);
    return this;
  }
  textCountFun.prototype.render = function() {
    var num = _getNum(this);
    if($('#input_count').length == 0) {
      this.input.after("<span id='input_count'></span>");
    }
    $('#input_count').html(num+"个字");
  }
  return textCountFun;
})();
<!-- 调用 -->
new textCount().init({id: '#input'}).render();
在textCount作用域外面智能访问到init()和render()方法。
html相关的代码
  <input type="text" id="input">
  <input type="text" id="rec">
让我们看看原型继承的写法怎么用。
var text = new Text({
  id: 'input', //组件的id
  alertNum: 6 //alert的弹出字数
}).init(); //渲染 + 绑定
最终写完执行就是下面这个样子。
我们的基础类,自定义事件、生命周期都在里面,其他组件继承这个类就可以了。
function Base(config) {
  this.elist = {};
  this.config = config;
}
Base.prototype = {
  on: function(type,fn) {
    if (!this.elist[type]) {this.elist[type] = []}
    this.elist[type].push(fn);
    return this;
  },
  fire: function(type) {
    var args = Array.prototype.slice.call(arguments, 1);
    var fns = this.elist[type];
    var i = 0;
    var len = fns.length;
    for(i; i < len; i++) {
      fns[i].apply(this, args);
    }
  },
  off: function(type, fn) {
    if (!type && !fn) {this.elist = {}}
    if (type && !fn) {this.elist[type] = []}
    var _index = function(arr, key) {
      for (var i = 0; i < arr.length; i++) {
        if(arr[i] == key) {
          return i;
        }
      }
    }
    if (type && fn) {
      var ind = _index(this.elist[type]. fn)
      this.elist[type].splice(index, 1);
    }
  },
  // 初始化绑定事件 + 渲染
  init: function() {
    this.bind();
    this.render();
    return this;
  },
  bind: function() {

  },
  render: function() {

  },
  destroy: function() {
    this.off();
  },
  get: function(key) {
    return this.config[key];
  },
  set: function(key, value) {
    this.config[key] = value;
  }
}
接下来是我们的继承函数,采用的是寄生组合式继承的方法(来自javascript高级教程)
function extend(child, parent) {
    function F(){}
    F.prototype = parent.prototype;
    var f = new F();
    f.constructor = child;
    child.prototype = f;
}
最后就是写我们组件相关的类了
//先不要写Text类的方法,继承之后在写Text类的扩展方法
function Text(config) {
  Base.call(this, config);
}
extend(Text, Base);
下面我们来扩展Text类的方法
// 得到组件元素
Text.prototype._getEle = function() {
  this.ele = document.getElementById(this.config.id);
}
// 复写bind方法
Text.prototype.bind = function() {
  var that = this;
  this._getEle();
  this.ele.addEventListener('keyup', function() {
    that.render();
    if(that.num > that.config.alertNum) {
      //触发监听的函数
      that.fire('alert',that.num);
    }
    console.log(text);
  })
}
//复写render方法
Text.prototype.render = function () {
  this.num = this.ele.value.length || 0;
  if(!this.ospan) {
    var ospan = document.createElement('span');
    this.ele.parentNode.appendChild(ospan);
    this.ospan = ospan;
  }
  this.ospan.innerHTML = this.num + '个字';
}
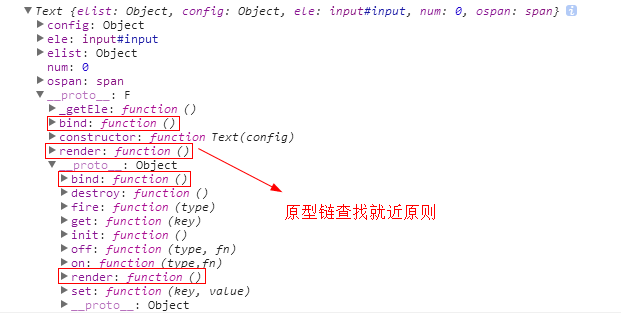
扩展完 + 继承以后类的属性方法 可以看到原型方法扩展并没有覆写Base类的方法,而是在F的实例对象上又写了一遍这个方法,这样根据原型就近的查找规则就相当于‘覆写’了bind和render方法。 接下来让我们使用吧!
var orec = document.getElementById('rec');
var text = new Text({
  id: 'input',
  alertNum: 6
}).init();
text.on('alert', function(num){
  orec.value = num;
  alert(num);
})
通过原生js实现了这个组件,我们已经很好的了解了组件的开发,这种构建方法代码耦合度较低,基础类得到了很好的复用,组件间还能通过fire和on来传递消息。但是这种方法还是有很多不友好的地方,继承还是不够简明,子类构造函数还是需要调用父类的构造函数等。这些都是我们需要改进的地方。
function mix(...mixins) {
  class Mix {}

  for (let mixin of mixins) {
    copyProperties(Mix, mixin);
    copyProperties(Mix.prototype, mixin.prototype);
  }

  return Mix;
}

function copyProperties(target, source) {
  for (let key of Reflect.ownKeys(source)) {
    if (key !== "constructor" &&
      key !== "prototype" &&
      key !== "name"
    ) {
      let desc = Object.getOwnPropertyDescriptor(source, key);
      Object.defineProperty(target, key, desc);
    }
  }
}
es6的混入可以将两个类的方法混入到继承的这个类上。
这个类就是自定义事件的类。
class Event {
  constructor() {
    this.event = {}
  }
  on(type, fn) {
    if (!this.event) {
      this.event = {}
    }
    if (!this.event[type]) {
      this.event[type] = [];
    }
    this.event[type].push(fn);
  }
  fire(type) {
    if (!this.event[type]) {
      return;
    }
    var args = Array.from(arguments).slice(1);
    var fns = this.event[type];
    var len = this.event[type].length;
    var i = 0;
    console.log(args)
    for (i; i < len; i++) {
      fns[i].apply(this, args);
    }
  }
  off(type, fn) {
    if (!type && !fn) {
      this.event = {}
    }
    if (type && !fn) {
      this.event[type] = []
    }
    if (type && fn) {
      let ind = this._index(this.event[type], fn);
      this.event[type].splice(ind, 1);
    }
  }
  _index(arr, fn) {
    for (let i = 0; i++; i < arr.length) {
      if (arr[i] === fn) {
        return i;
      }
    }
  }
}
这个类主要完成事件的绑定和视图的渲染
class Base {
  constructor() {
    this.config = {}
  }
  init() {
    this.render();
    this.bind();
    return this;
  }
  bind() {

  }
  render() {

  }
  destroy() {

  }
}
继承mix来混入继承,这样我们就可以实现我们组件主要代码,就是复写bind() and render()方法
class alertNum extends mix(Base, Event) {
  constructor(config) {
    super();
    this.config = config;
  }
  getNum(input) {
    return input.value.length;
  }
  render() {
    if (!this.ospan) {
      this.ospan = document.createElement('span');
      this.oinput = document.getElementById(this.config.id);
      this.oinput.parentNode.appendChild(this.ospan);
    }
    var num = this.getNum(this.oinput);
    this.ospan.innerHTML = num;
    let oshow = document.getElementById('show');
    oshow.value = this.oinput.value;
  }
  bind() {
    var that = this;
    this.oinput.addEventListener('keyup', function() {
      that.render();
      that.fire('alert',that.getNum(that.oinput));
    })
  }
}
var al = new alertNum({
  id: 'input',
  alertnum: 5
}).init();

al.on('alert',function(num) {
  if(num > this.config.alertnum) {
    alert(num)
  }
})
The text was updated successfully, but these errors were encountered:
No branches or pull requests
经过上面的文章学习,和js面向对象以及自定义事件的学习,自己总结并实现了不用jquery的混入,用js的原型继承来写javascript的组件化。
先来看看我们实现组件的样子:
最简陋的写法
作用域隔离
引入私有变量
getNum和bind是设为私有,可以避免其他代码的修改而导致的错误。
在textCount作用域外面智能访问到init()和render()方法。
面向对象的方法
html相关的代码
让我们看看原型继承的写法怎么用。
最终写完执行就是下面这个样子。

抽象出Base类
我们的基础类,自定义事件、生命周期都在里面,其他组件继承这个类就可以了。
接下来是我们的继承函数,采用的是寄生组合式继承的方法(来自javascript高级教程)
最后就是写我们组件相关的类了
下面我们来扩展Text类的方法
扩展完 + 继承以后类的属性方法

可以看到原型方法扩展并没有覆写Base类的方法,而是在F的实例对象上又写了一遍这个方法,这样根据原型就近的查找规则就相当于‘覆写’了bind和render方法。
接下来让我们使用吧!
通过原生js实现了这个组件,我们已经很好的了解了组件的开发,这种构建方法代码耦合度较低,基础类得到了很好的复用,组件间还能通过fire和on来传递消息。但是这种方法还是有很多不友好的地方,继承还是不够简明,子类构造函数还是需要调用父类的构造函数等。这些都是我们需要改进的地方。
使用es6来写组件
使用Es6的混入
es6的混入可以将两个类的方法混入到继承的这个类上。
创建Event类
这个类就是自定义事件的类。
创建Base类
这个类主要完成事件的绑定和视图的渲染
混入继承
继承mix来混入继承,这样我们就可以实现我们组件主要代码,就是复写bind() and render()方法
使用我们的组件
总结
The text was updated successfully, but these errors were encountered: