This integration provides priority-based, colored event notifications for Home Assistant light entities.
It wraps an existing light and creates a new entity that supports colored and animated notifications.
Color Notify enables you to wrap an existing light entity and configure customizable, colorful notifications that display on the light. Notifications are prioritized and managed automatically, so only the highest-priority notification is shown. Standard light functions (on/off, brightness, color) are fully supported, even with notifications active.
- Toggleable Notifications: Notifications are represented as Switch entities. Simply turn on and off notifications an ColorNotifiy will sort out showing it on the appropriate lights.
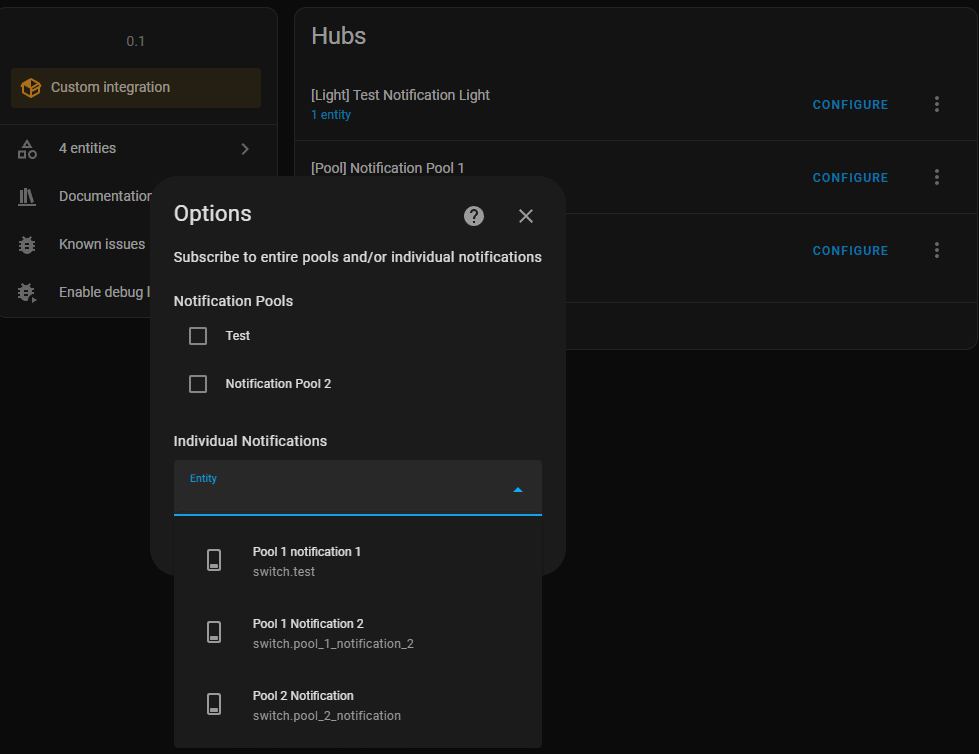
- Subscription-based Notifications: Create notifications in "pools". Multiple pools can be created each containing multiple notiifcations, and wrapped lights can subscribe to each individual notification or entire pools at once.
- Priority-based Notifications: Assign a priority to each notification, so only the highest-priority active notification is shown. Lower-priority notifications can optionally temporarily display when activated.
- Standard Light Control: The wrapped light continues to function as normal, with on/off and color controls.
- Customizable Colors and Effects: Configure colors, brightness levels, and animations for each notification. Animations can include loops and timed steps for complex sequences.
- Copy the integration files to
custom_components/ha-color-notifyin your Home Assistant configuration. - Restart Home Assistant.
- Add
https://github.com/cobryan05/ha-color-notifyas a custom repository in HACS (select type "Integration"). - Search for Color Notify in HACS and download it.
- Restart Home Assistant.
After installation, go to Settings > Integrations, click Add Integration, search for Color Notify, and follow the prompts to set up your first notification-enabled light entity.
When adding a ColorNotify integration you can select to create a new Light or a new Notification Pool. Once created each integration can be further customized by using the "Configure' button on the integration.
Notification Pools can be 'configured' to add/remove/modify notifications within that pool.
Lights can be 'configured' to update light options or subscribe a light to new notifications
Set up a new light entity by adding a new Color Notify integration, or clicking "Add Hub" when on the Color Notifiy integration settings page. When setting up a new Color Notify light entity, select an existing light to wrap. This will create a new entity with enhanced notification capabilities. Use this new entity in place of the original light for notification functionality.
- Dynamic 'On' Priority: When enabled, turning on the light directly will set it to a priority slightly above any active notifications, ensuring the light state overrides.
- Auto-cycle Between Same-priority Notifications: If multiple notifications have the same priority, they will cycle automatically. Use the delay setting to define how long each notification displays.
- Temporary Display of Lower-priority Notifications: When a new notification is activated, it can temporarily display regardless of its priority. Set the duration for this temporary display or disable it by setting it to 0.
Notifications can be customized with colors, priorities, and display patterns. Priorities control which notification is displayed if multiple are active.
- Priority: Determines the notification’s display priority.
- Temporary Display on Activation: Forces the notification to display briefly upon activation, even if it’s lower priority.
- Automatic Clear After Timeout: Automatically turns off the notification after a set timeout. The timeout timer starts as soon as the notification begins. A timeout of '0' will auto-clear immediately after the pattern finishes.
- Color: Sets a solid color for the notification.
- Pattern: Allows complex animations with sequences of colors and delays.
- Loop: Use
[to start and], loopcntto end a loop (e.g.,], 5for five repetitions). - Step: Each step includes
"rgb": [R,G,B]for color and"delay": secondsfor duration (e.g.,{"rgb": [255,0,0], "delay": 0.5}for red for 0.5 seconds).
- Loop: Use
Set up a new notification pool (a collection of notifications) by adding a new Color Notify integration, or clicking "Add Hub" when on the Color Notify integration settings page.
To add new notifications 'configure' a notification pool.
To change the notification a light is subscribed to 'configure' the light.
To activate a notification, simply switch on the desired notification’s switch entity.
- Separate RGB and brightness controls for animations.
- Add services for notification management (e.g., clear notifications, cycle notifications).
- Fade control, non-RGB configs (hsv, color temp)
Enjoy using Color Notify for enhanced visual notifications in Home Assistant!


